Page 1 of 5 123 ... LastLast
Results 1 to 15 of 66

Thread: [Guide] 2T, 3T-c & 18R-c Electronic Dizzy's. "How To"

  1. #1
    Resto Rodder Domestic Engineer GA61XX's Avatar
    Join Date
    Mar 2006
    Location
    south austraila
    Posts
    558

    Default [Guide] 2T, 3T-c & 18R-c Electronic Dizzy's. "How To"

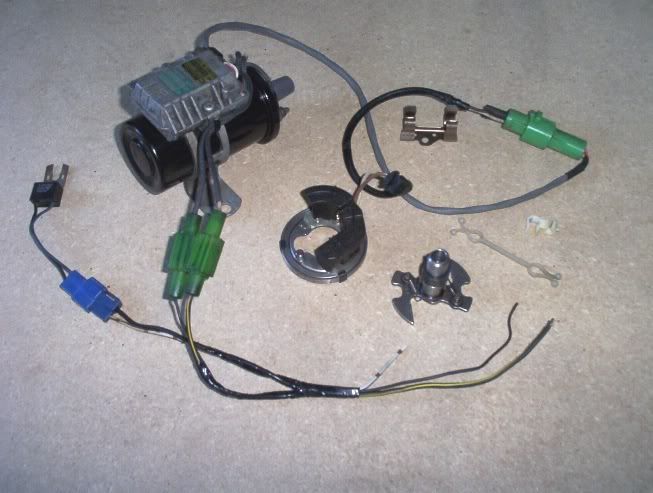
    You will need to find a RA60, RA65, RT133,or '85 RT142,( Not the '86 ) these motors will have the parts needed.. the list, what & where..
    Coil & igniter + plugs & 12inch of wire. 21/22R motor
    Dizzy internals. rotor cam, rotor plate & pick up, springs. 21/22R motor
    The 22R will have lighter counter weights, & may be used for a different mechanical advance. Best done on a Dyno.
    Metal clip to hold plug on side of dizzy. 2S motor, SA63, ST141
    noise suppresor + plug & 8inch of wire. ST141, SV11, these have a single plug ( Blue )
    also 5mm of clear PVC fish tank tube. (info & pic's still to come)

    Pic's of the parts needed, for the conversion


    RA60 dizzy parts / ST141 metal clip / SV11 noise suppresor.


    Remove the 2 screws, holding the rotor plate / pickup, & lift wire out & remove unit from dizzy, then remove the plastic cap with a small screw. ( do not damage as you will need it )


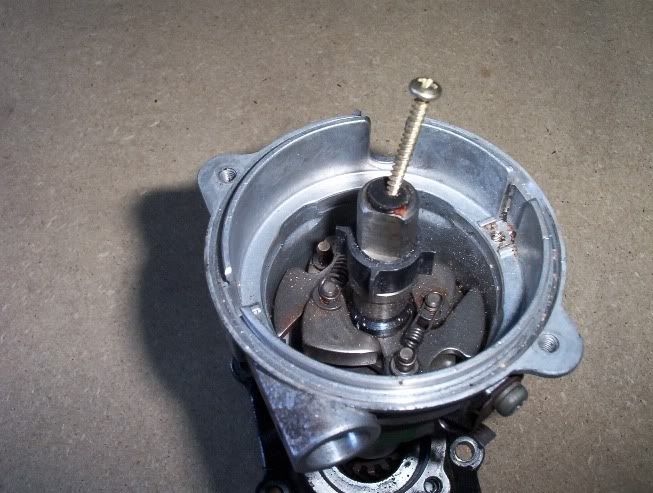
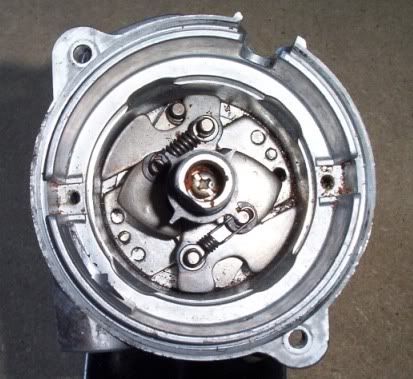
    remove screw from top of rotor cam.. remove springs, ( again do not damage ) you can now lift out the rotor cam..


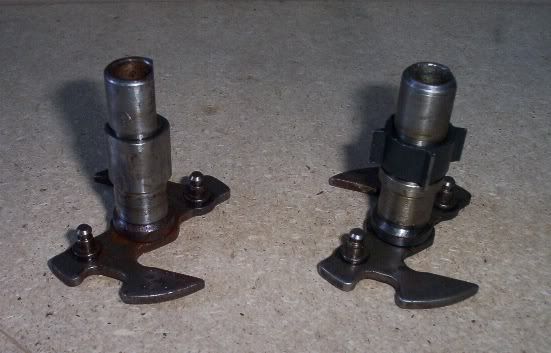
    18R rotor cam, & 21R / RA60 rotor cam. removed..


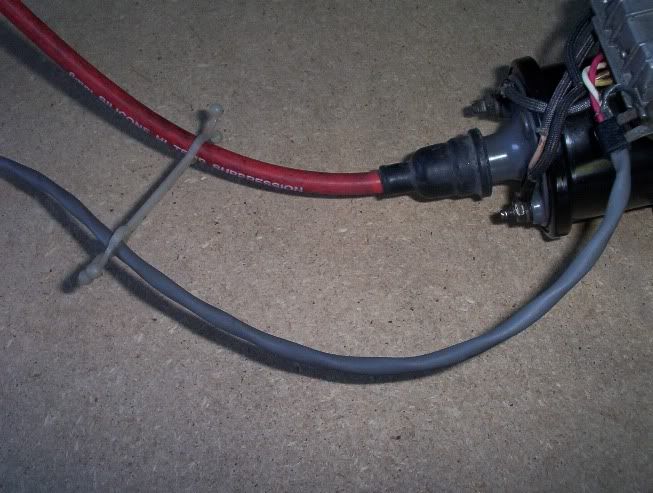
    clip on the lead's

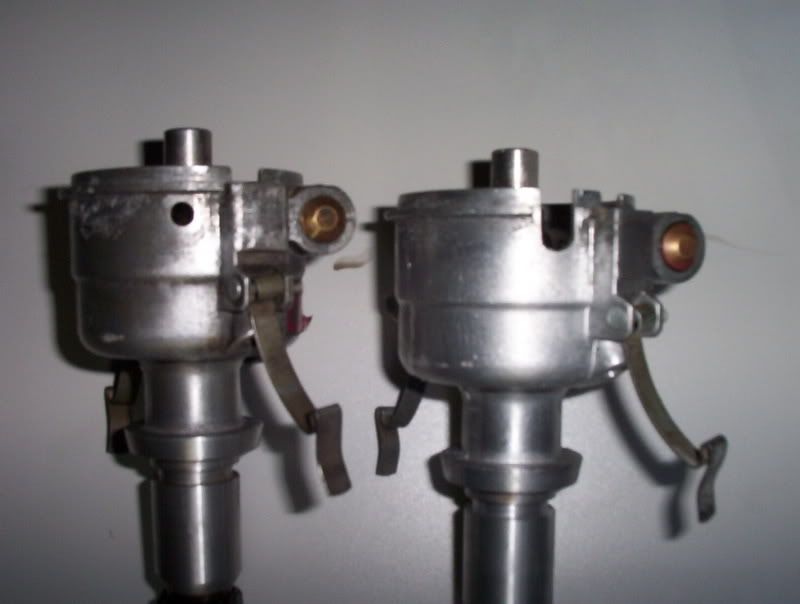
    Some 18R dizzy's need a small Mod to fit the 21R's part's


    Before & After ..

    FAQ: What are the chances of your bits and pieces fitting my bosch dizzy?
    Answer: NO. The electronic Dizzy part's will Only fit Nipon dizzy's.
    As the parts ars from a Nipon dizzy,
    Last edited by GA61XX; 09-06-2010 at 05:00 PM.
    Project: '82, GA61 XX

  2. #2
    Resto Rodder Domestic Engineer GA61XX's Avatar
    Join Date
    Mar 2006
    Location
    south austraila
    Posts
    558

    Default Re: 2T, 3T-c & 18R-c Electronic Dizzy's. "How To"

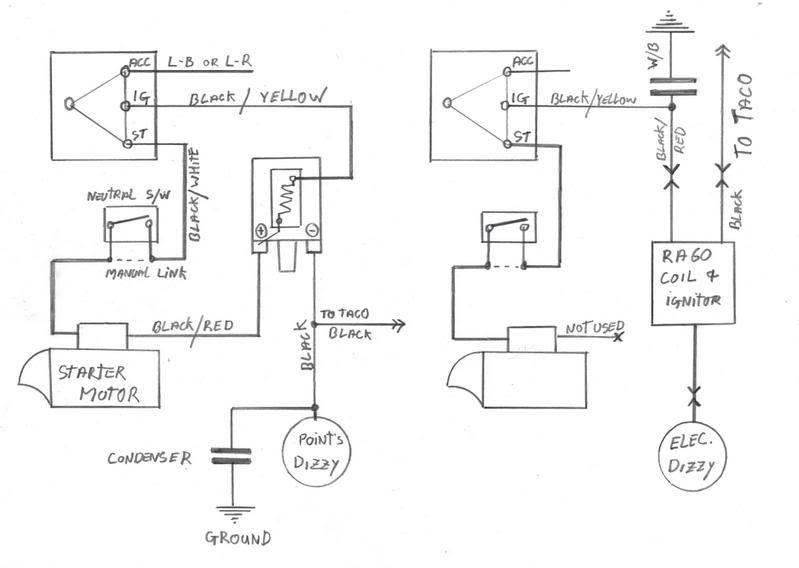
    wireing diagram & how to fit your new, Electronic Dizzy.


    Ok. To do the job.

    1. Set the motor to TDC ( or as i do, 8 deg. before, as this will help later. ), To do this, use a 19mm spanner, on crankshaft bolt, in the midle of the harmonic balencer, & rotate in a clockwise direction. Check that you are on #1, by removing the dizzy cap, the rotor button should point to #1.
    2. Undo clamp bolt, use 12mm spanner, remove clamp & bolt ( Note: 2T-G & 3T dizzys, have a built in clamp )
    3. Trace back the Black wire, from the side of the old dizzy, back to the old coil. Do this by removing the tape. It will be taped in with a few other wires. This Black wire will also join, to another, Black wire, going to your taco.
    4. Remove the old dizzy. ( NOTE the rotation & position of rotor button. This will help later. )
    5. Disconnect wires from old coil. Then remove old coil.
    6. Take dizzy back to the bench, & rebuild, with the new parts.

    How to fit new Dizzy, coil, & igniter.
    1. Connect / solder, the thin Black wire, from the igniter Green plug to the Black wire going to your taco. Then tape it up.
    2. Connect / solder, the White/Black wire, from the Blue plug on the noise suppresor, to the White/Black wire, ground -ve, you found when undoing the tape, near the old dizzy. Then tape it up.
    3. Connect / solder, the thick Black/Yellow, ignition +ve, to the thick Black/Yellow wire, from the old dizzy. Then tape it up. ( Note: RA60 has Black/Red wire, from the ignition )
    4. Tape up the Black/Red wire from the old dizzy. As it's no longer used. ( It can also be disconected from the starter . NOT the Black/white wire. )
    5. Retape, all the wires up, back to the motor, & the chassis loom. ( Note: you should not tape up the new Gray, twin & shielded cable, that goes from the new, coil/ignitor, to the dizzy. this will just hang, or ( if avalible, use the two other, " Toyota " plastic clips, to hold wire safely ) from the coil/ignitor, to the clip on the side, of the dizzy. )
    6. Move the rotor button, of the new dizzy, to the resting position, of the old dizzy. ( Note: This should be, just before #1, as it will spin slightly as you slide it in. )
    7.Now holding the new dizzy, in the same position, as the old one was removed, slide the dizzy in, watching out not to damage, the "O"ring. A small amount of motor oil, on the "O"ring will help it slide in easier. ( Note: The tongue at the bottom, of the dizzy shaft, must line up with the slot, in the oil pump, for correct fitment. )
    8. Rotate the dizzy a bit, to line up the rotor button, with the #1, spark lead on the rotor cap. Refit the clamp & bolt.
    9. Connect the Green plug, from new coil/igniter, to new dizzy, & place in clip on side of the dizzy.
    16. Recheck that the rotor button, is on #1, & is at TDC or ( 8 deg. before. )
    10. START the motor. If it was set to 8 deg. motor should start first turn, of the key.
    11. Check the timing, with a timing light, & set. ( 8 deg. before, typical. )
    12. Close the bonnet, & go for a drive.
    13. Enjoy the fact, that you will never, have burnt points again.
    Last edited by GA61XX; 25-07-2007 at 05:18 PM.
    Project: '82, GA61 XX

  3. #3
    Toymods Vice President Chief Engine Builder TheToyman75's Avatar
    Join Date
    Jul 2005
    Location
    NSW
    Posts
    3,224

    Default Re: [Guide] 2T, 3T-c & 18R-c Electronic Dizzy's. "How To"

    Gold...... !
    1971 2T-B Celica TA22 ST.
    1973 2T-G Celica TA22, aka "The Unicorn".
    1975 2T-G Celica TA27 GT
    1976 2T-G Celica TA23, aka "The Colonel".
    1985 3F Auto FJ62 Landcruiser
    1989 7M-GTE MA70 Supra, aka "The Poopra"

    History: Rods Classic Celica Sampler thread.

  4. #4
    Texas Hold'em Junky Backyard Mechanic fade-e's Avatar
    Join Date
    Oct 2005
    Location
    NSW
    Posts
    419

    Default Re: [Guide] 2T, 3T-c & 18R-c Electronic Dizzy's. "How To"

    agreed... awsome stuff there

    cheers

  5. #5
    Resto Rodder Domestic Engineer GA61XX's Avatar
    Join Date
    Mar 2006
    Location
    south austraila
    Posts
    558

    Default Re: [Guide] 2T, 3T-c & 18R-c Electronic Dizzy's. "How To"

    Quote Originally Posted by fade-e View Post
    agreed... awsome stuff there

    cheers


    Hmmmmm... sorry... but not so good yet.. there is a few things missing..
    But .. i'll be helping another do this conversion in the next week & i'll take some extra pic's & fill in the blank details...

    cheers
    Project: '82, GA61 XX

  6. #6
    Junior Member Backyard Mechanic toyo-al's Avatar
    Join Date
    Mar 2008
    Location
    NSW
    Posts
    490

    Default Re: [Guide] 2T, 3T-c & 18R-c Electronic Dizzy's. "How To"

    That would be awesome mate!

    I still haven't had a chance to sort through all the parts you sent haha
    '73 TOYOTA Celica TA22 - Project
    '07 SUZUKI DR650 - Adventure Rig
    '77 YAMAHA XT500 - Project

    The Drivers' Vault

  7. #7
    Resto Rodder Domestic Engineer GA61XX's Avatar
    Join Date
    Mar 2006
    Location
    south austraila
    Posts
    558

    Default Re: [Guide] 2T, 3T-c & 18R-c Electronic Dizzy's. "How To"

    Quote Originally Posted by toyo-al View Post
    That would be awesome mate!

    I still haven't had a chance to sort through all the parts you sent haha


    Cool...!!! you have all the parts needed...

    i'll add a few extra things/details to this thread.. on how to set them up & where to start on the rebuild.. i'm hopping for a good set of pic's....
    Project: '82, GA61 XX

  8. #8
    Not known unless ur blown Backyard Mechanic
    Join Date
    May 2007
    Location
    South Australia
    Posts
    315

    Default Re: [Guide] 2T, 3T-c & 18R-c Electronic Dizzy's. "How To"

    Mine don't work... Using the ra60 22r-e coil& igniter with the st141 noise thingo and a 2tg-eu dizzy... I've buggerd up somewhere I think? OOR my dizzy is crap. So tomorrow unless I can get it to work, its 22r dizzy internals or back to ghey old points..

  9. #9
    Resto Rodder Domestic Engineer GA61XX's Avatar
    Join Date
    Mar 2006
    Location
    south austraila
    Posts
    558

    Default Re: [Guide] 2T, 3T-c & 18R-c Electronic Dizzy's. "How To"

    Quote Originally Posted by Radar View Post
    Mine don't work... Using the ra60 22r-e coil& igniter with the st141 noise thingo and a 2tg-eu dizzy... I've buggerd up somewhere I think? OOR my dizzy is crap. So tomorrow unless I can get it to work, its 22r dizzy internals or back to ghey old points..

    Hmmmmm.... RA60 has a 21R not 22R-E...

    Ok.. as your local i'll try to get help to you.. as this is a good thing & i've never had a prob'...

    PM sent..

    i'll give details on an answer once we fix this prob'
    Project: '82, GA61 XX

  10. #10
    Not known unless ur blown Backyard Mechanic
    Join Date
    May 2007
    Location
    South Australia
    Posts
    315

    Default Re: [Guide] 2T, 3T-c & 18R-c Electronic Dizzy's. "How To"

    Bad igniter, swapped it over for a different one.
    Then off to sprints for a Bosch GT40 coil and 12v relay.

    Now works sensational. First turn of the key.

  11. #11
    Why am i always a.. Domestic Engineer RAAAH23's Avatar
    Join Date
    Jul 2009
    Location
    New South Wales
    Posts
    533

    Default Re: [Guide] 2T, 3T-c & 18R-c Electronic Dizzy's. "How To"

    Quote Originally Posted by GA61XX View Post

    Pic's of the parts needed, for the conversion

    i have that coil pack and all those green connectors would that mean i have a electronic dizzy? i dont know bout the internals of the dizzy
    Cheers, Alex

    - 1976 TA23 2T-GTE GT3076 ID1000cc E85 Haltech PS1000, W58, G Series Diff, B45 Simmons

  12. #12
    Resto Rodder Domestic Engineer GA61XX's Avatar
    Join Date
    Mar 2006
    Location
    south austraila
    Posts
    558

    Default Re: [Guide] 2T, 3T-c & 18R-c Electronic Dizzy's. "How To"

    if you have those parts with the Square plugs..

    Then it's the 21R electronic dizzy parts from a RT133 corona...

    The RA60 has Round plugs..
    Project: '82, GA61 XX

  13. #13
    Why am i always a.. Domestic Engineer RAAAH23's Avatar
    Join Date
    Jul 2009
    Location
    New South Wales
    Posts
    533

    Default Re: [Guide] 2T, 3T-c & 18R-c Electronic Dizzy's. "How To"

    i believe they are round... is it still electronic?
    Cheers, Alex

    - 1976 TA23 2T-GTE GT3076 ID1000cc E85 Haltech PS1000, W58, G Series Diff, B45 Simmons

  14. #14
    Resto Rodder Domestic Engineer GA61XX's Avatar
    Join Date
    Mar 2006
    Location
    south austraila
    Posts
    558

    Default Re: [Guide] 2T, 3T-c & 18R-c Electronic Dizzy's. "How To"

    Quote Originally Posted by RAAAH23 View Post
    i believe they are round... is it still electronic?

    Hmmmmmmm... what part of this thread are you missing...
    if your parts look ike these in this thread .. then they it's an Electronic Dizzy..

    The Square plugs are the 21R electronic dizzy parts from a RT133 corona...

    The RA60 has two x Round plugs.. one thin wire for the Taco, & a fatter Black/red strip for the IG'

    The RA65 only has one large plug with two x wires in it.. but is the same deal as the earlier electronic dizzy's..
    Project: '82, GA61 XX

  15. #15
    Junior Member Grease Monkey viccelicara23's Avatar
    Join Date
    Apr 2009
    Location
    Victoria
    Posts
    126

    Default Re: [Guide] 2T, 3T-c & 18R-c Electronic Dizzy's. "How To"

    Hi,

    I was just wondering if anybody knew what the part numbers are for the dissys they can come from, i got one from the wreckers and i think it is the wrong one i just want to confirm before going back.

    Cheers
    My Cars http://www.toymods.net/forums/showthread.php?t=50628
    Daily - 1994 JZA80 Supra
    Weekender - 1976 RA23 Celica
    Past - 1990 RN105 Hilux 4x4

Similar Threads

  1. 2T Head and 3T Block, standard items - any problems?
    By -NiCkeL- in forum Tech and Conversions
    Replies: 8
    Last Post: 09-11-2006, 01:29 PM
  2. 2T/ 3T carby
    By suss_slide in forum Tech and Conversions
    Replies: 11
    Last Post: 25-08-2006, 10:11 PM

Bookmarks

Posting Permissions

  • You may not post new threads
  • You may not post replies
  • You may not post attachments
  • You may not edit your posts
  •