


 Reply With Quote
I spy a blue hose


6 Plugs indeed! Dam and they are big too. You look at the size of that hole and then look at all the plugs that need to go through it and all you can think dam... But it must be do-able cuss heaps of other people have done it. Thats what kept me going. And it got done aswellAnyways more on that later, i have piccies!!!
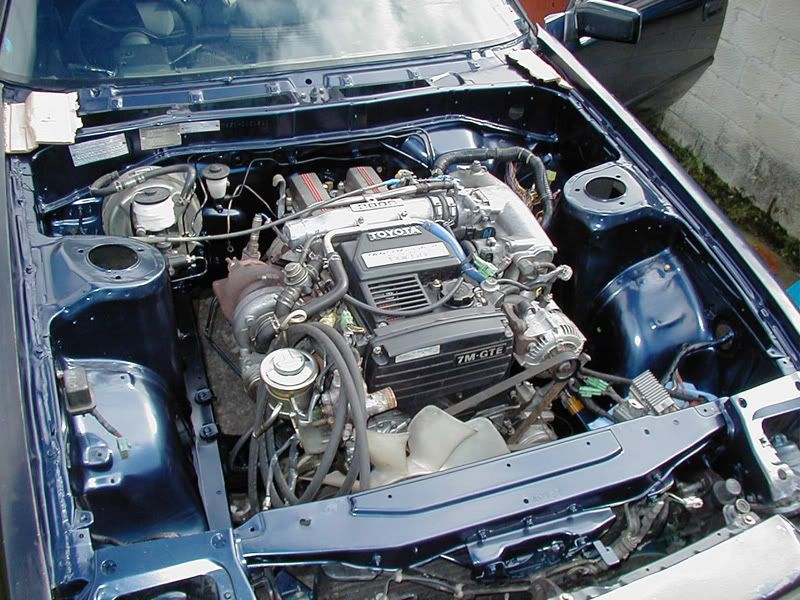
This is her. All the 7M goodness. She looks small without everything else in the engine bay hey.
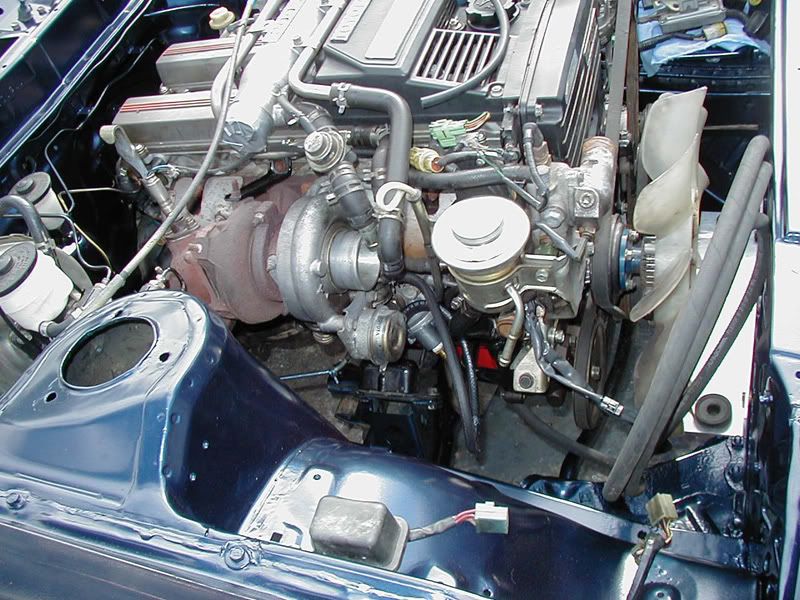
A lovely picture of the RH side of the engine showing clearances and that big wound up oil pipe is my line to the oil cooler. And that oil cooler is mounted directly behind my grill, more on that another day.
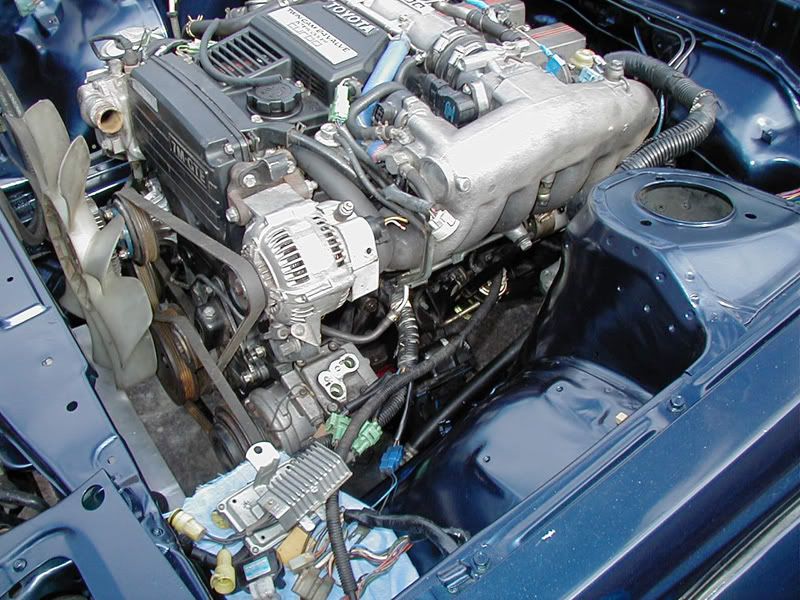
And a shot of the LH side of the engine bay. I couldn't believe how much more room there is to replace that fuel filter than on the 6M! The 6M was soo cramped and the 7M has space galore down there. Me is happy.
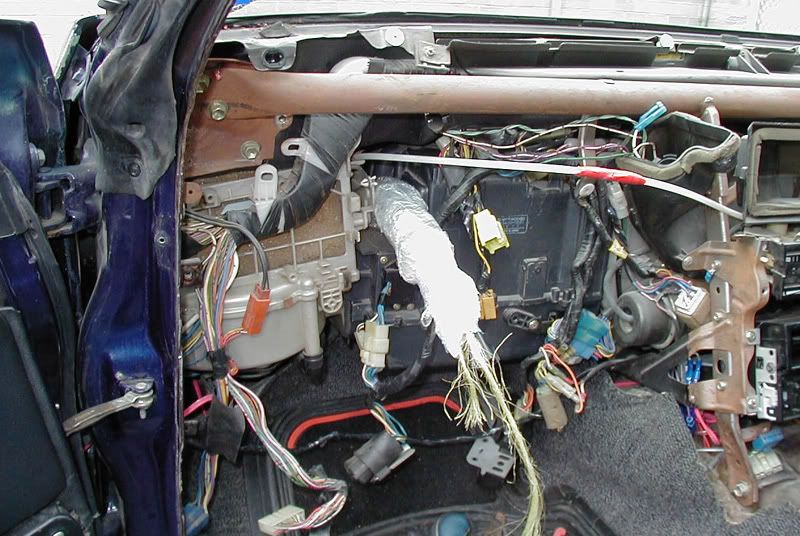
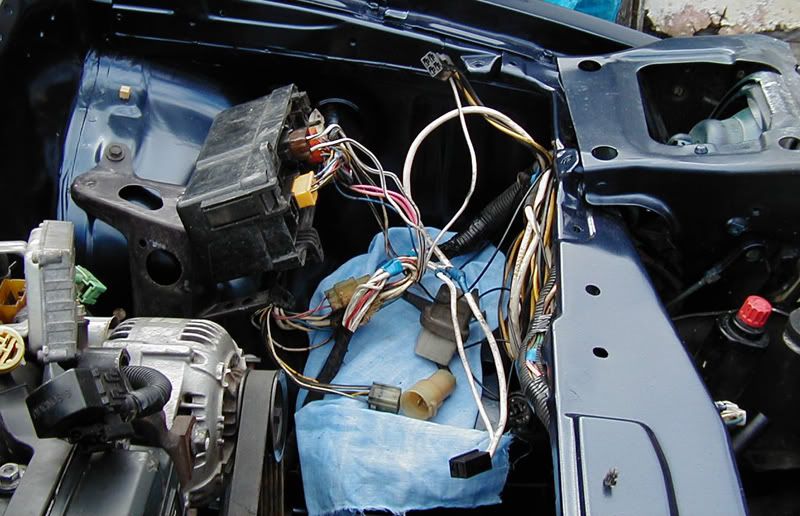
And yup, thats Gladwrap! Thanks JCMF, i'd rep ya again if i could. First off i wrapped electrical tape around the plugs. You have to put each plug on a different angle to keep the loom as small as possible, so lots of electrical tape holding each plug on a wierd angle to the loom was required. Once that was done, i tied a piece of string to the end of it so i could feed it through becuase it was only me today. Then heaps of gladwrap! Then she popped through the firewall and gap pretty easily.Very happy. Only took me an hour to get it through. Well i was happy about that, i dont care how long it took you guys...
And this is them all free, ready to be spliced and wired up.
I rewired the loom that runs across the radiator and popped that into the car. I dont have any specific pictures of the re wiring i did but explaining it... What i did was pull apart the loom bit by bit and pull out the 4 alternator wires bit by bit. This eliminates a good couple metres of wiring and eliminates the need to splice into these wires as you have now relocated them to the other side of the engine bay. Just chop off the length of wire you dont need and solder them back together. And dont forget to run a small black wire back through the loom becuase that splices off the small black wire on the alternator and runs somewhere down the RH side of the vehicle.
And this is as far as the wiring got to today. Cut the wires to length for the alternator to Junction Block 3, soldered one together and then my soldering iron broke! It just stopped working on me! Not happy, ah well the day wasnt lost. Gots lots of other little things done.
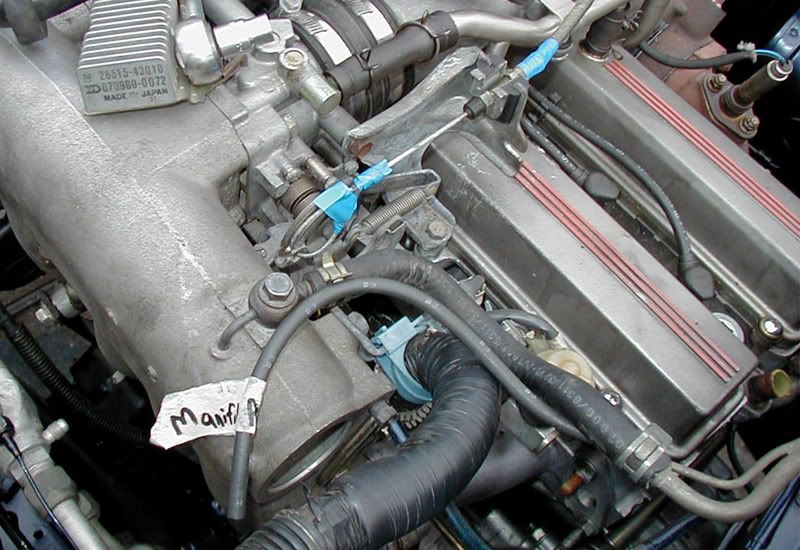
This is my dodgy throttle cable setup. The throttle cable was too long by about 4-5cm, so i looped it around on the throttle attatchment and electric taped it all up! Good as new. hehe, will fix it later on.
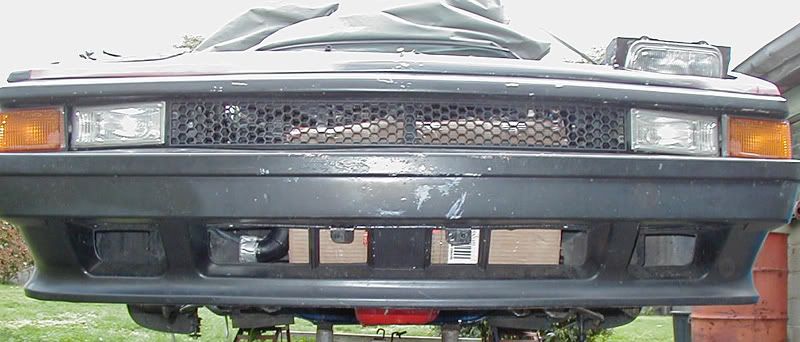
Got my intercooler fitted up today. Quiet happy with how i got it mounted up. Done with some dodgy mounting brackets but hey, she's in there, mounted where i want it and she aint going anywhere. May do something about it one day.
Last edited by Negative Boost; 04-09-2006 at 11:58 PM.
MA61 Part Numbers, Upgrades and General Infomation <--- Clicky Clicky

I spy a blue hose
SHE LIVES!
1984 MA61, 1998 Honda Hornet CB600F
Blue hose? Where, lol... Dammit. I knew someone would pick that out straight away. Okay im a bum who wont pay big $$ for a hose from Toyota.
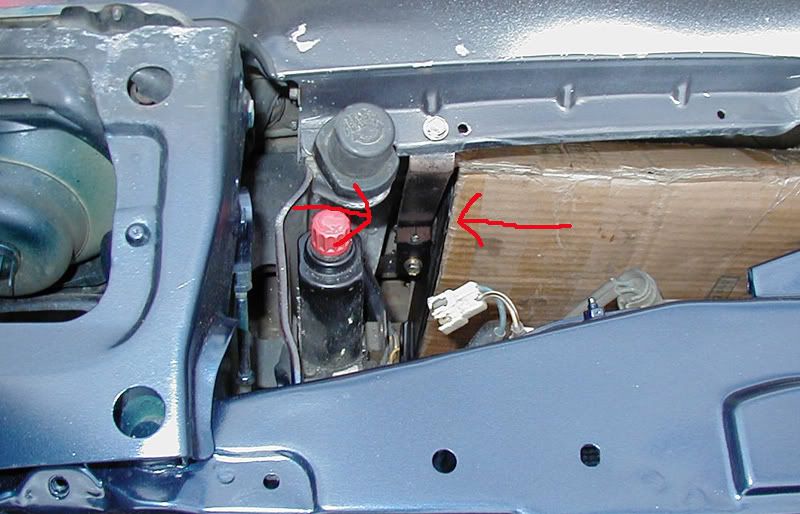
The bracket on the otherside of the intercooler.
And the frontal shot of it. Notice how it dosnt sit below the bumper. Was quite happy that it worked out that way. Yes its on an angle but who cares, it works and thats all that matters, lol.
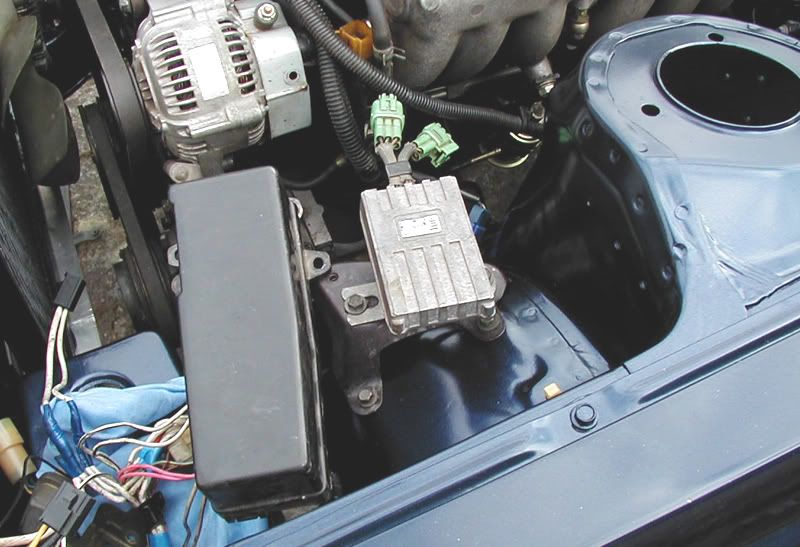
And this is the 7M Ignitor mounted where the old 6M coil used to be. The Ignitor has the 7M mounts on it and fits perfectly there. Looks like it was made to be there. Looks awsome, hehe.
A pic showing how i mounted the fuel lines and that small canister that i dont know what it is. Anyone know what that small canister back on the LH side of the engine bay is? Anyways i used the same hole for both the canister and bracket for the fuel line becuase i forgot what mounted where and this lined up nicely, so thats how it is.
If you look closely here you can see the black AC line running down the chassis rail. And just gander at everything else.
Now the questions, only 2 atm...
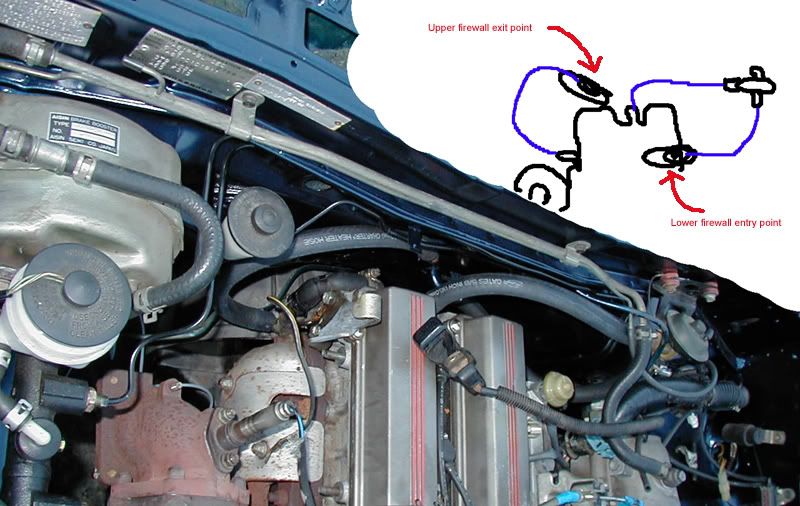
Is that how the heater hoses are setup? I couldn't quiet remember and was silly enough not to write it down on paper. Hope you like the master drawings there.
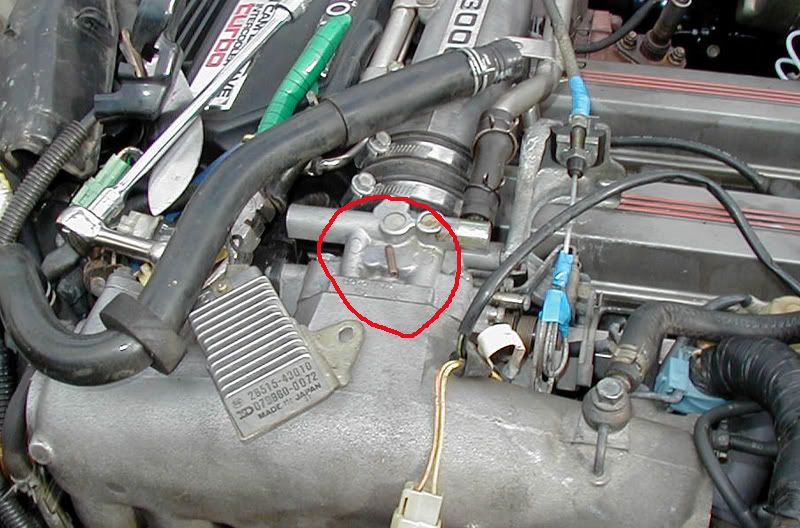
And this little pipe coming off the throttle body, where does that go to, what does it do?
Cheers
Sam
MA61 Part Numbers, Upgrades and General Infomation <--- Clicky Clicky
Exactly how mine is run.Originally Posted by Negative Boost
That canister I have hooked up to the little nipple coming off the TB. From what I remember before taking out the old 5m, it was a vacuum canister of some sort? I got a vacuum hose coming from the nipple (TB) to the middle nipple of the canister, and a climate control hose (hose #3 written on it) coming off the one on the side. Hey, its not wrong thats all I can say, my car and heater works fine
SHE LIVES!
1984 MA61, 1998 Honda Hornet CB600F
Pics a plenty mate, keep em comingDefinately gives people like me a more detailed idea of what's involved with a conversion like this
Oh.. in addition to tbe blue hose... why does your pliers have a green taped handle?
SHE LIVES!
1984 MA61, 1998 Honda Hornet CB600F
:_) far out that looks swish. Bloody nice sam.
AH yes i can take the blame for that blue hose
Update on the blue hose: False alarm, it wasn't me i didn't put it there.
98 3rz-fe Hilux 4x4
97 Hiace AWD Super Custom 1kz turbo diesel (sold)
87 MA70 w/ 1JZ-GTE Manual Conversion GT (moss growing on roof deteriorating away but open to offers)

Yep, the line from the top is the charcoal cannister line.
As for the throttle cable, I shared your problem. The solution I came up with is a little more....durable thoughHasn't failed me in the slightest, and the TB has full sweep.
Teh UZA80 - Project Century - Remotely p00'd by association
that engine bay looks so nice and organised.. purposeful.
I miss that about my converted ma61 - everything in there had a job to do, and everything else was removed.
Stupid JZA80 engine bay is filled with crap. Love your work... so you'll be bringing it up for toyotafest I assume?
Nice work! This has made me excited about getting mine done! Unfortunately I have a rebuild to do before I even get started on the car..
1984 MA61 - http://www.toymods.net/forums/showthread.php?t=12340
1972 RT81 - http://www.toymods.net/forums/showthread.php?t=24160
RObErT_RaTh - I think it's fair to say we all love the bush
Viper_Nipplex - If bush is this popular, just wait until the boxes are ready
Haha, thanks for the comments guys. Urantia yours cracked me up as that was me who put that there
Yian, wouldnt have a clue why the green tape is on the pliers, its just there lol. Thanks for the help also. Should be able to work out all the vacumm hoses 2moro morning.
JCMF, i think i can visualise what you mean, i'll take a look at it 2moro morning. If you have a picture that'd be tops. Thanks
Draven, i wish i could bring it up to Toyotafest. I'd love to go one day but i think this years a miss unfortunatly. Getting there from Tassies just a little bit harder for us folk
Does it matter if i run the line for the boost guage from a tee-d line from the manifold? Because i also have to run a line from the manifold to the charcoal canister (under the brake master cyclinder) and theres only one nipple on the manifold so i have to put a tee in the line for both the charcoal canister and boost gauge. Is that okay?
And that other little canister (its not another charcoal canister is it?), what does that do? Do we need it?
edit, i'll rep some when it lets me
MA61 Part Numbers, Upgrades and General Infomation <--- Clicky Clicky
I haven't had time to find one yet, ironically I haven't found a picture of my engine bay yet
Teh UZA80 - Project Century - Remotely p00'd by association
Oh, and hard to get there from Tassie!? Sheesh, what is it to get there from Perth!?
Teh UZA80 - Project Century - Remotely p00'd by association
You don;t have to cross 10 hours of water with a bunch of snoring Tasmanians sleeping next to you.
SHE LIVES!
1984 MA61, 1998 Honda Hornet CB600F
Amen!
By the way i was on the old boat when it broke down! Useless information but i thought it was interesting, lol. I was quiet puzzled when i saw lights out the window in the dark, halfway into our journey. They hadnt told us that they had turned around and we were heading back to Devonport. It was the city lights fron Burnie that i could see lol.
MA61 Part Numbers, Upgrades and General Infomation <--- Clicky Clicky
 Posting Permissions


Bookmarks