
 Reply With Quote
Originally Posted by Negative Boost
LoL! that musta seemed like a quick trip to melbourne.


Do, we just have to spend longer than that seated in one position with no scenery....
Teh UZA80 - Project Century - Remotely p00'd by association
LoL! that musta seemed like a quick trip to melbourne.
98 3rz-fe Hilux 4x4
97 Hiace AWD Super Custom 1kz turbo diesel (sold)
87 MA70 w/ 1JZ-GTE Manual Conversion GT (moss growing on roof deteriorating away but open to offers)
But since you're driving you can have fun and you control what's going on. Sitting on a ferry is just *yawn*
You have driven across the Nullarbor right?
Teh UZA80 - Project Century - Remotely p00'd by association
I haven't been to WA, NT, TAS any of it. I been QLD, NSW, VIC, and KI and went to Fiji and that's about it.
Very smick and clean engine bay! 7M FTW
Secondedededed.
1984 MA61 - http://www.toymods.net/forums/showthread.php?t=12340
1972 RT81 - http://www.toymods.net/forums/showthread.php?t=24160
RObErT_RaTh - I think it's fair to say we all love the bush
Viper_Nipplex - If bush is this popular, just wait until the boxes are ready
Hehe, thanks very much guys. And i reckon even though i havnt driven across the Nullabor, i'll have to side with JCMF. All that jolly driving time, on a straight road with no scenery would get a bit boring....
And just a little update. No pics sorry. It was raining on and off today so i started wiring up the cabin. I finished wiring in junction block 2 (driver footwell) and dam that was painful... Never want to do that again. Theres like NO space down there whatsoever to get your hands and tools up to plugs 2E and 2I. Really annoying but its done.
I've also finished joining the engine harness with the body harness aswell. Ended up with 6 wires running across the top of the dash, which sat just behind the big rusty looking bar and went around and down past the RH aircon vent. I say i've joined the engine harness with the body loom but i havnt soldered it up yet as i didnt have an extra pair of hands with me unfortunatly. But its all taped together and just needs solder.
Finished wiring the alternator in aswell today and started wiring up the EFI main relay. Wired in one wire and then ran out of wire and electrical tape and it was getting late and had to go out so i called it a day. Should finish the wiring on monday. Gotta work 2moro... actually in like 1 hour and 40 minutes...
MA61 Part Numbers, Upgrades and General Infomation <--- Clicky Clicky
Alrighty O then. Got a little bit more done today after a week away.
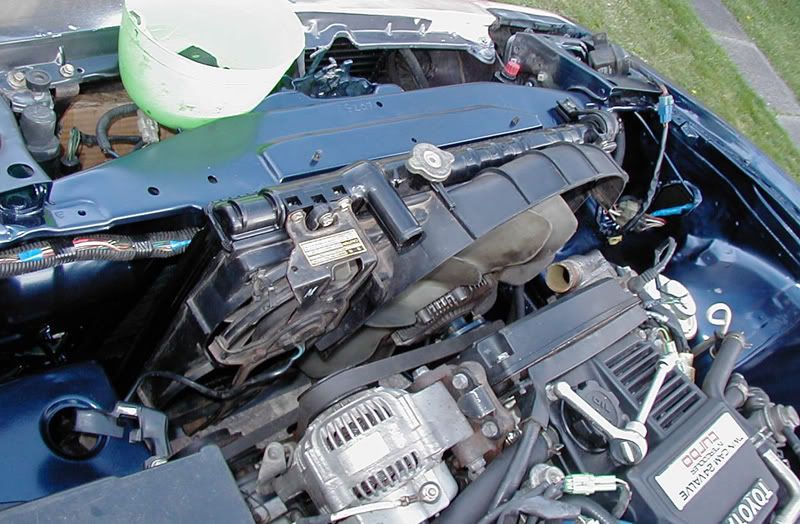
I've finished the wiring in the engine bay and made them look all neat. Well sorta anyways. I've also grouped all the wires together in the cabin to make that look neater. Pics of the cabin wires will come later.
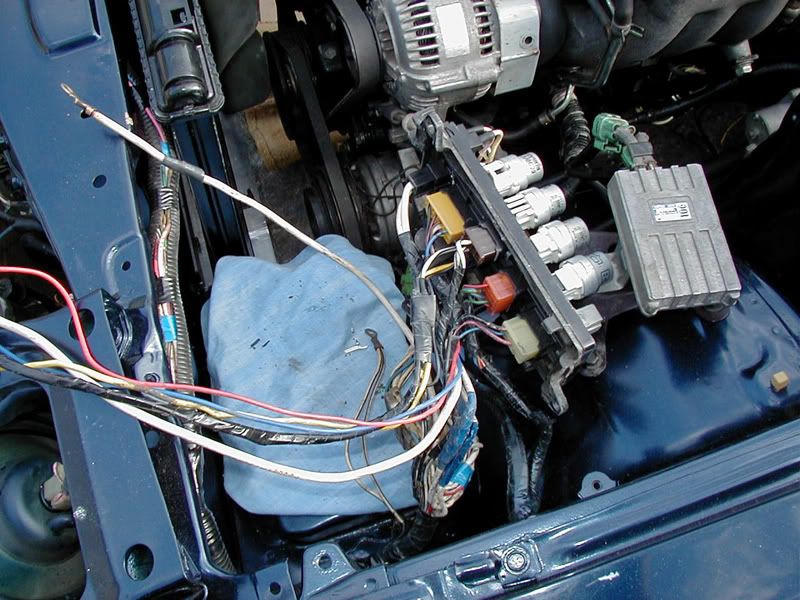
Here i was just wiring in the EFI main relay and trying to sort it all out to make it look neater.
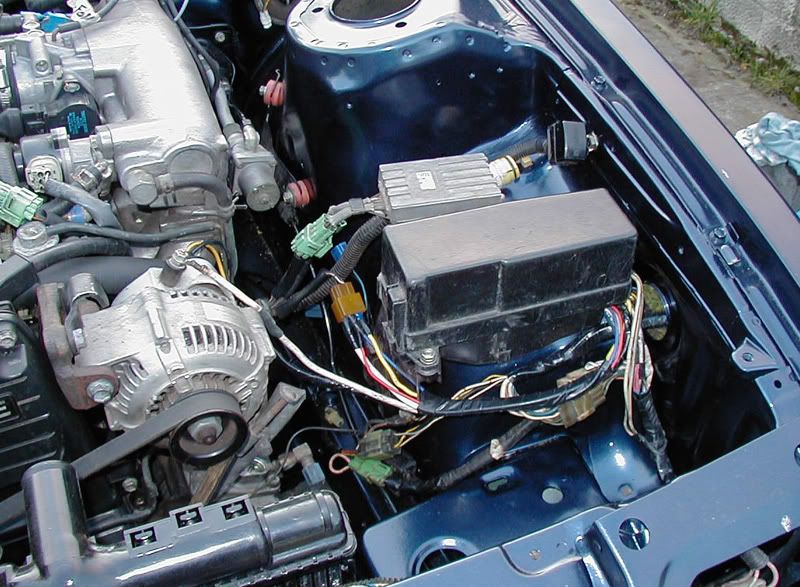
And this is the final layout. Pretty dam neat i think, if i do say myself.
I've connected up the oil cooler which now sits directly beind the grill held on with some trusty zip ties. I'll get some pictures of how i routed the lines for the cooler later.
*i've somehow deleted the pictures... will get some more later*
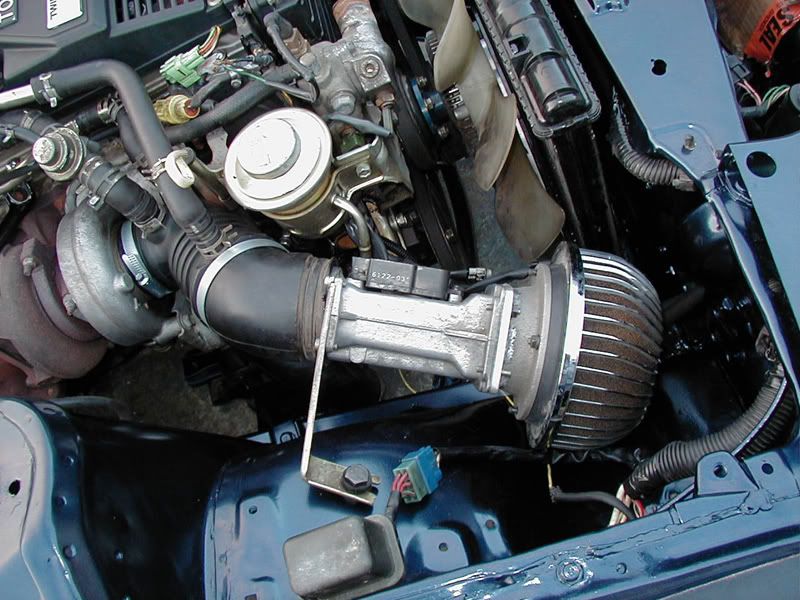
I've mock fitted the AFM and filter up today. Theres a nice crack in the accordian pipe which i have to fix before i put everything back on and tighten it all up. The bracket i used for the AFM was the stock MA70/7M bracket. It sat perfectly on the side there and i just drilled a hole and stuck a bolt and nut through it.
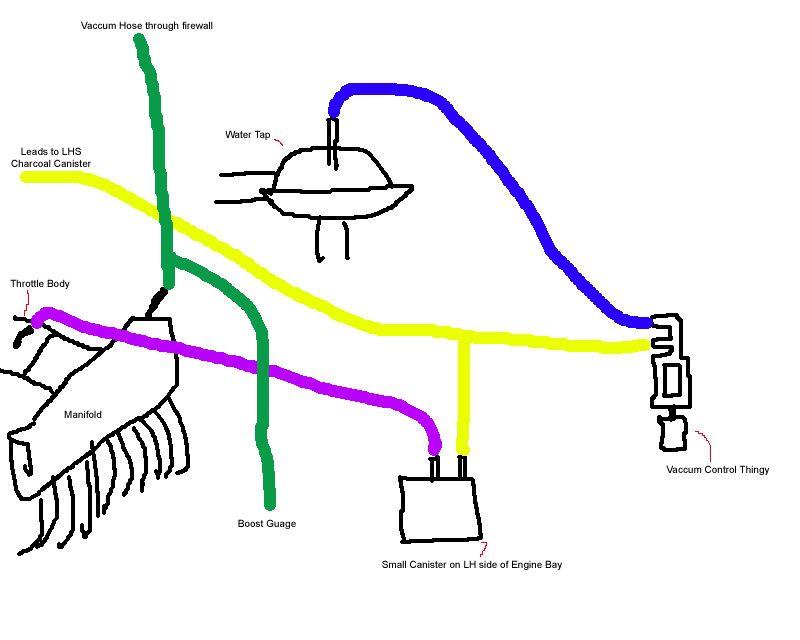
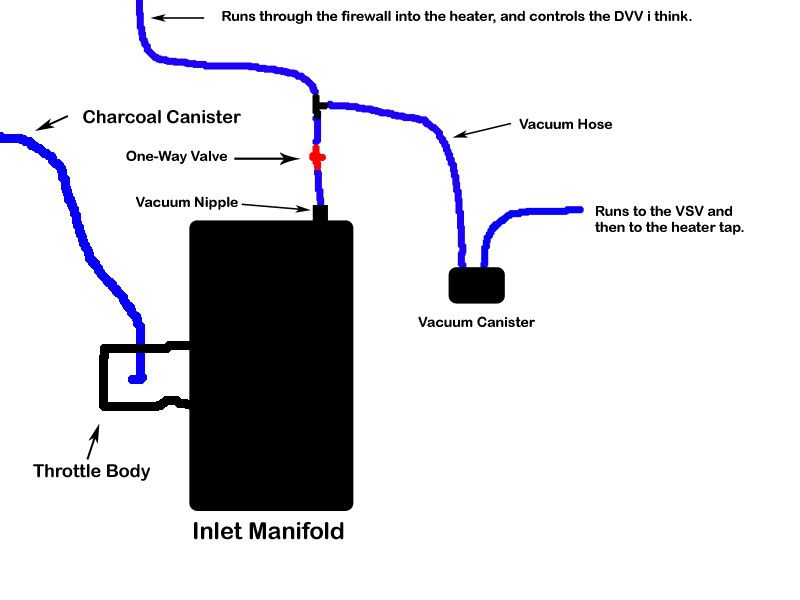
And i think i have these vacumm hoses done all correctly now... Here's a wonderful picture drawn by me depicting how i have mine set up. Please can someone tell me its correct as i do not understand what the Vacumm Switch thingy does.
EDIT:: I'm editing a really old post here just so others dont go wrong if they are following the above vaccum hose diagram! Pay attention to the below diagram, the above one is wrong! I learnt the hard way.
I ran my boost gauge from the spare nipple on the brake booster hard line. Originally this is designed for the Auto cruise control.
Last edited by Negative Boost; 01-06-2007 at 01:27 AM.
MA61 Part Numbers, Upgrades and General Infomation <--- Clicky Clicky
looks pretty right to me. Remember, your heater wont work and will cause you much angst if the temp sensor under the rear part of the centre console isnt hooked up!
PS love the colour, looks neat as!
Project megap00 - Gave up and sold up. Money tree died
Cheers mate. Will keep that in mind
MA61 Part Numbers, Upgrades and General Infomation <--- Clicky Clicky
No worries, I just know it annoyed the crap outta me for the first month or so after mine was on the road (I hadnt bothered to put the console in yet). The heater would just blow hot air all the time, I replaced the little coil thing 3 times, nothing worked. Sucked in summer!
Project megap00 - Gave up and sold up. Money tree died
Well she's coming along sweetly now!
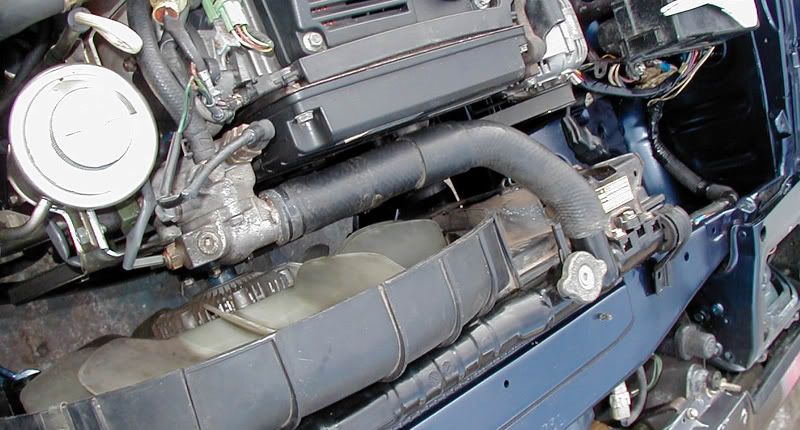
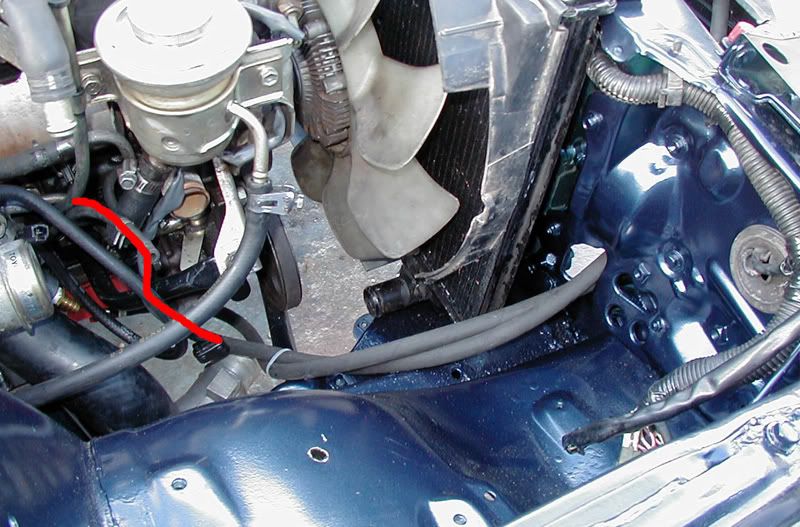
Got the radiator in there today, all mounted and everything. Had to cut a fair bit out of the shroud, around the bottom especially. I think the radiator could've gone to the left approx 5-10mm more, that would've given some more fan to shroud clearance but she is where she is.
The radiator in all its glory.
And a picture showing the Upper radiator hose fitted. Its just the stock 7M upper rad hose. Well i think anyways... it was just lying around the garage so i grabbed it... It fits and thats all i care. Might get a picture of the shroud one day to show how much i've cut out of it.
And here's how i've plumbed up my oil cooler...
First pic showing where i've mounted the oil cooler. Its just sitting in there with some zip ties, thats why its on an angle like that. Has just enough room in there for the oil hoses to get around.
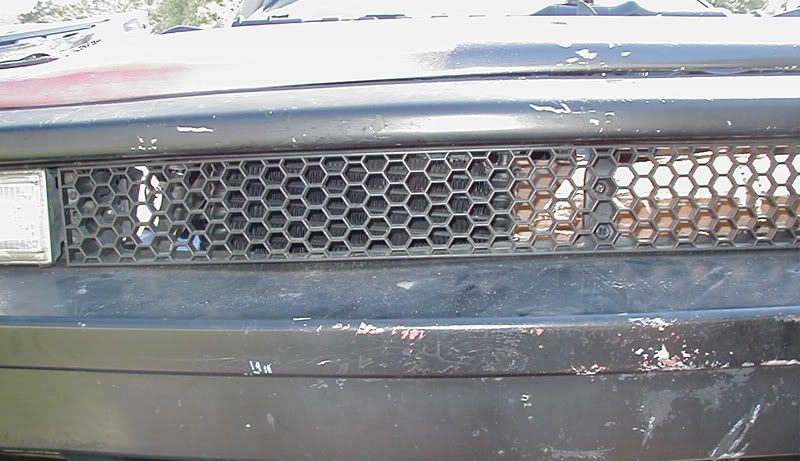
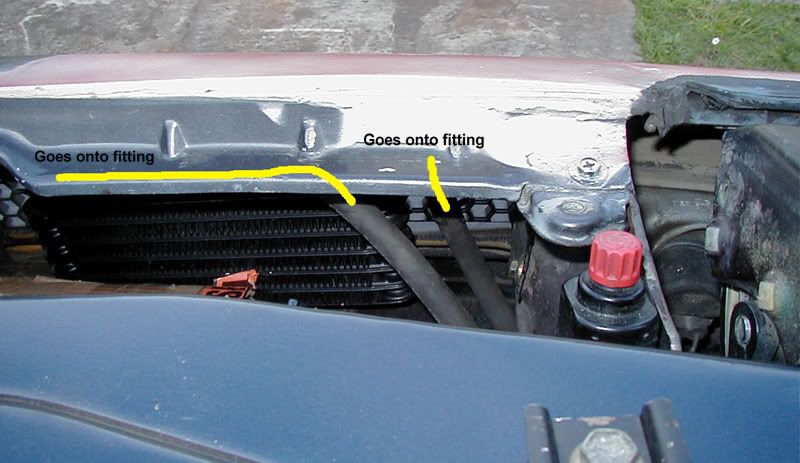
And this is behind the grill showing the oil hoses to and from the oil cooler.
And they run through a factory hole in the radiator frame like this...
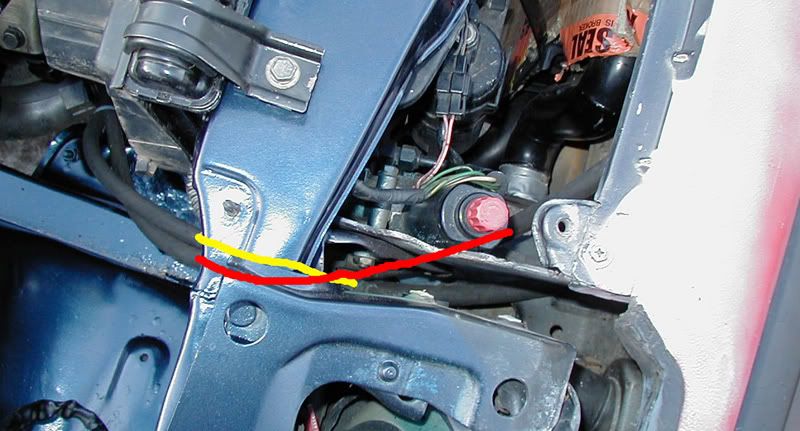
And you can see the red line runs to the oil adapter where the pressure pipe for the oil cooler is situated.
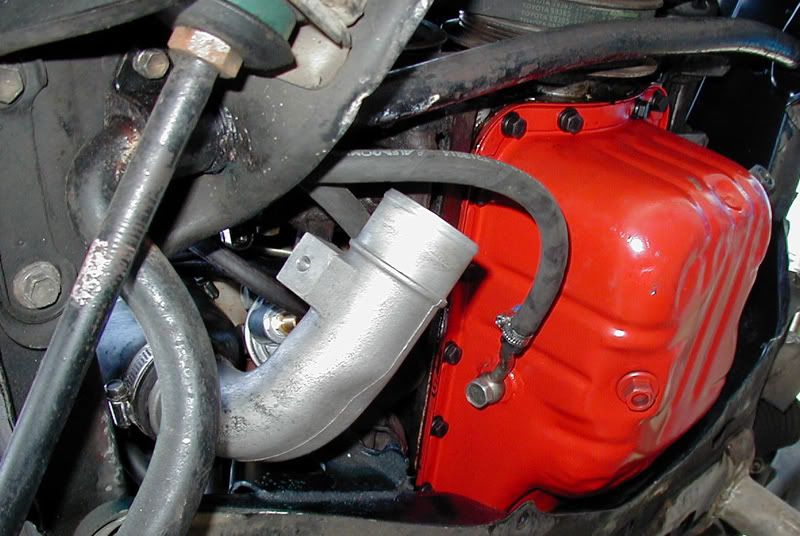
And this is the return into the sump for the oil cooler. Easy as one two... five.
MA61 Part Numbers, Upgrades and General Infomation <--- Clicky Clicky
I've also filled up the clutch master and bleed it a little but still needs alot of bleeding.
Fit the powersteering rack back into the car.
Wired up the check engine light and
Put the dash back in.
So i've just go to run the inlet piping up, tighten a few bolts here and there, add some oil, install remote oil filter and shes about ready to be fired up! Can't wait, she getting really close now.
How did everyone go about there pressure line for the steering rack? The stock setup has a screw-in type fitting at both ends (pump and steering rack) whereas the 7M has banjo fitting at either ends. I'll be getting a cutom made pipe for mine tommorow with the correct ends (screw in for the rack and banjo for the pump) but how did everyone else go about hooking this up?
MA61 Part Numbers, Upgrades and General Infomation <--- Clicky Clicky
Alrighty, everything bar the lower IC pipe is on. Pics up later... In the mean time i have another problem!
1, im getting really sick of this conversion.
2, i have no power... at all.
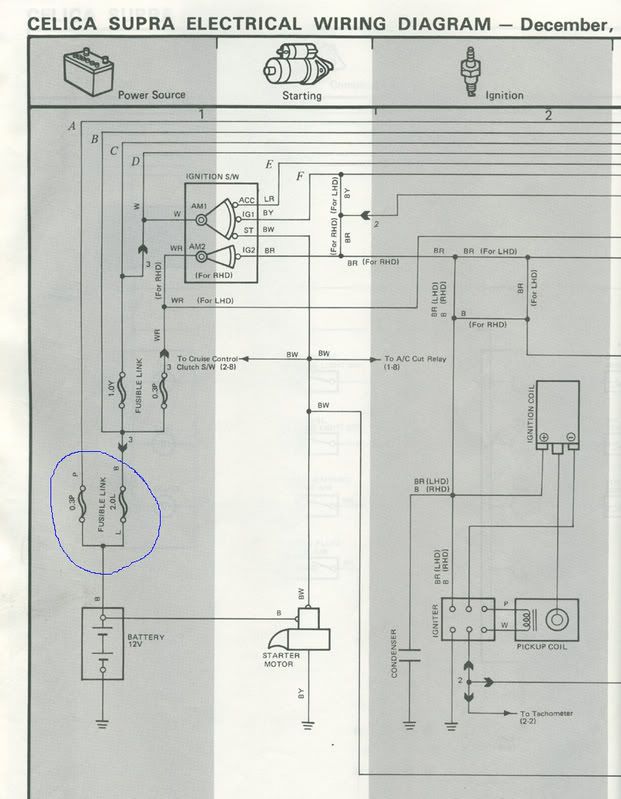
I've put this down to the fact that im missing the other wire that runs off the +ve terminal to the 2 fusible links. Here's a picture with a blue circle around the 2 fusible links.
What i need to know is, which 2 fusible links are these as there are a few on that wiring diagram. I have a hinting suspicion that they are the 2 that are in Junction Block 3 (Engine bay fuses). Really need this problem solved quickly! Thanks guys
MA61 Part Numbers, Upgrades and General Infomation <--- Clicky Clicky
 Posting Permissions

Bookmarks