Page 1 of 2 12 LastLast
Results 1 to 15 of 20

Thread: Connector "how-to" question..

  1. #1
    The Aberrational Chief Engine Builder Andrew162's Avatar
    Join Date
    Nov 2005
    Location
    NSW
    Posts
    3,148

    Default Connector "how-to" question..

    Well, not having that much experience with these connectors, I wanted to ask how exactly to remove the wires from the connector.


    This is the old connector from my thermo-fans... ignore the black thing on top of the connector, it's a securing plug of some sort for the connector to sit on.


    Might be a bit hard to see, but it's just a 2-pin connector.

    There doesn't seem to be any real obvious way of getting the wires out of this, so I wanted to know if anyone had any experience in tinkering with connectors of this type.

    Thanks for any help.
    Clicky -> THEN: 1999 RAV4/GT-Four Hybrid
    Clicky -> NOW: 1985 ST162 Celica SX (Gen III 3S-GE) - Kitted & Resprayed


    TRIKKE | Video

  2. #2
    Junior Member Too Much Toyota oldcorollas's Avatar
    Join Date
    Aug 2005
    Location
    sydney
    Posts
    12,496

    Default Re: Connector "how-to" question..

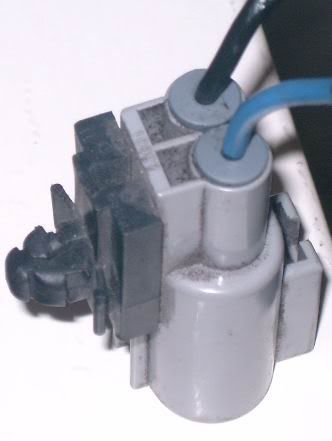
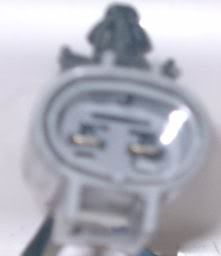
    onthe mating side of the plug, just above each of the pins, there's a little channel.... if you look in there, there is usually a tab that you can bend back with a bobbypin (yes they are handy little buggers) and the pin and wire should slide out.... pull the rubber out of the other end too..
    "I'm a Teaspoon, not a mechanic"
    "There is hardly anything in the world that a man can not make a little worse and sell a little cheaper" - John Ruskin (1819 - 1900)

    AU$TRALIA... come and stay and PAY and PAY!!! The moral high horse of the world!

  3. #3
    MR 18RG Chief Engine Builder The Witzl's Avatar
    Join Date
    Jul 2005
    Location
    NSW
    Posts
    3,164

    Default Re: Connector "how-to" question..

    i also find pick tools or one of those farking tiny "jewelers" screwdrivers works really well at lifting the lock tabs up to pull the wire/pin out.
    ...... butt scratcher?!


  4. #4
    Yep they look great Carport Converter gianttomato's Avatar
    Join Date
    Sep 2005
    Location
    Victoria
    Posts
    1,811

    Default Re: Connector "how-to" question..

    Yep, also recommend tiny jeweller's screwdriver for this job. Do it carefully and try not to damage the tab otherwise it will be nearly impossible to remove the pin/wire.

  5. #5
    My Missus is a Domestic Engineer BradW's Avatar
    Join Date
    Oct 2005
    Location
    NSW
    Posts
    661

    Default Re: Connector "how-to" question..

    Any chance of a clearer second pic.

    Some of these connectors have a piece that comes out of the center to reveal the locking tabs. Usually the removable piece is a different colour to the main plug.

    As the others have said though, use a small stiff pin to push back the locking tab and pull the wire out the back of the plug.
    Brad

    Old Corollas never die...

    My KE30
    Updated 15/7/2007............ yes, I need to pull my finger out.

  6. #6
    The Aberrational Chief Engine Builder Andrew162's Avatar
    Join Date
    Nov 2005
    Location
    NSW
    Posts
    3,148

    Default Re: Connector "how-to" question..


    Finally managed to get it apart, and yes it is one of those types of connectors that has an inner detachable section, so it made accessing the locking tabs (that had to be lifted to remove the pins) easier to get to. This one is the same colour unfortunately, which didn't help matters when trying to dismantle it.


    Also unfortunately it's not going to be as easy as I thought to replace the wire that the pin connects to... it's crimped in a permanent fashion, which looks as though it can't be re-used. Just means I can't use this connector like I wanted to, doesn't matter though... it's just joining two wires together, and there's other ways around that. It just won't looks as 'factory' as before.

    I'm open to suggestions if anyone can think of ways to preserve the pins originally used in this connector, if it can be done at all. Remember however, I don't have a great array of tools or even a garage to work within, as one could probably guess with my makeshift katana letter-opener and tweezers.
    Clicky -> THEN: 1999 RAV4/GT-Four Hybrid
    Clicky -> NOW: 1985 ST162 Celica SX (Gen III 3S-GE) - Kitted & Resprayed


    TRIKKE | Video

  7. #7
    My Missus is a Domestic Engineer BradW's Avatar
    Join Date
    Oct 2005
    Location
    NSW
    Posts
    661

    Default Re: Connector "how-to" question..

    You can reuse these pins. What I do is open the tabs around the rubber boot and slide the boot off the wire. Now wriggle the wire around so the strands break at the end of the section where they are crimped. You can use a small pair of side cutters to clean up any extra strands that don't break off. What you will be left with is the terminal with wire under the crimped section still. Take your new wire and slip the rubber boot on it and strip back a length of insulation roughly as long as the old crimped section. Now neatly solder this to the terminal. Try not to get a big build up of solder on the terminal as it will be hard to get back into the connector. Let it cool, slip the rubber boot back up and crimp down the tabs onto the boot.

    Solder the wire before crimping the boot into place or the heat will melt the boot.

    Hope this makes sense. Good luck
    Brad

    Old Corollas never die...

    My KE30
    Updated 15/7/2007............ yes, I need to pull my finger out.

  8. #8
    Yep they look great Carport Converter gianttomato's Avatar
    Join Date
    Sep 2005
    Location
    Victoria
    Posts
    1,811

    Default Re: Connector "how-to" question..

    You can buy new pins.

    Not sure where you might buy them in Sydney, but JayDees Electronics in Bayswater (Melbourne) has them.

  9. #9
    The Aberrational Chief Engine Builder Andrew162's Avatar
    Join Date
    Nov 2005
    Location
    NSW
    Posts
    3,148

    Default Re: Connector "how-to" question..

    Thanks for the info Brad. gt, I've tried Jaycar here in Sydney and they don't have them.. there may be other places to try, but I don't know if I want to go through all the hassle. It is, after all, just one connector I guess...
    Clicky -> THEN: 1999 RAV4/GT-Four Hybrid
    Clicky -> NOW: 1985 ST162 Celica SX (Gen III 3S-GE) - Kitted & Resprayed


    TRIKKE | Video

  10. #10
    JZ Powered Too Much Toyota EldarO's Avatar
    Join Date
    Oct 2005
    Location
    Western Aus
    Posts
    5,614

    Default Re: Connector "how-to" question..

    if its just a two peice connector, theres a remote control type pug called a deans connector, they're zero loss connectors, some of the best on the market.

    just go to your local hobby store an pick up a pair, they come with heat shrink aswell, very easy to use.

    "venom" make the same thing, the deans are red, venoms are green.

    Eldar.O.

  11. #11
    Junior Member 1st year Apprentice Marc205's Avatar
    Join Date
    Sep 2005
    Location
    WA
    Posts
    33

    Default Re: Connector "how-to" question..

    That looks like a QK or QL connector. I don't know about the eastern states, but in WA you can get them from Alanco.

  12. #12
    tilting at windmills Carport Converter Ben Wilson's Avatar
    Join Date
    Sep 2005
    Location
    ACT
    Posts
    1,956

    Default Re: Connector "how-to" question..

    Quote Originally Posted by EldarO
    if its just a two peice connector, theres a remote control type pug called a deans connector, they're zero loss connectors, some of the best on the market.

    just go to your local hobby store an pick up a pair, they come with heat shrink aswell, very easy to use.

    "venom" make the same thing, the deans are red, venoms are green.

    Eldar.O.
    Remember to stick a small cable tie around them so they won't come undone...

  13. #13
    The Aberrational Chief Engine Builder Andrew162's Avatar
    Join Date
    Nov 2005
    Location
    NSW
    Posts
    3,148

    Default Re: Connector "how-to" question..

    Thanks for all the helpful replies guys. 
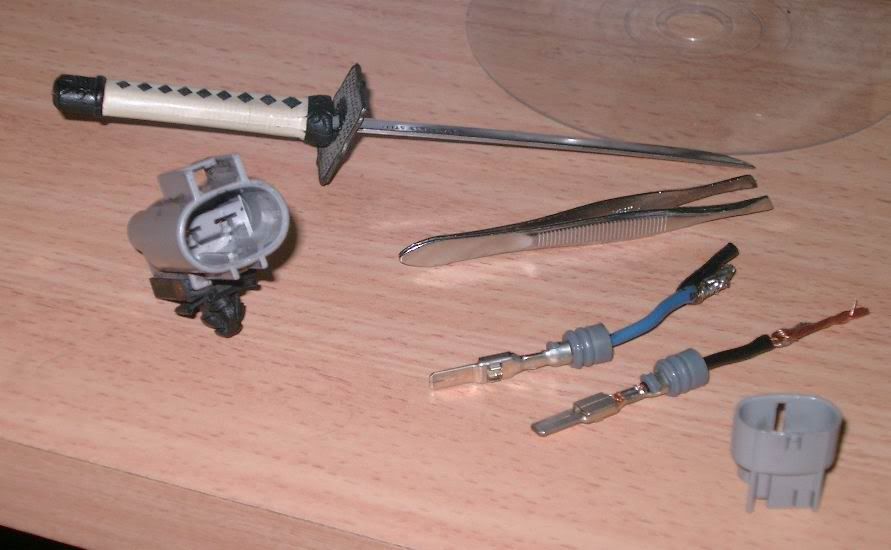
It appears to be a QL-type pin, but it appears you can only buy them in packs of 100. I only require two.

    I think I've managed to sort it out now, as well as a few other engine bay bitz 'n' pieces...
    Clicky -> THEN: 1999 RAV4/GT-Four Hybrid
    Clicky -> NOW: 1985 ST162 Celica SX (Gen III 3S-GE) - Kitted & Resprayed


    TRIKKE | Video

  14. #14
    My Missus is a Domestic Engineer BradW's Avatar
    Join Date
    Oct 2005
    Location
    NSW
    Posts
    661

    Default Re: Connector "how-to" question..

    It doesn't appear to be either the QK or QL connectors according to the images in the links.

    Glad to hear you have it sorted though.
    Brad

    Old Corollas never die...

    My KE30
    Updated 15/7/2007............ yes, I need to pull my finger out.

  15. #15
    The Aberrational Chief Engine Builder Andrew162's Avatar
    Join Date
    Nov 2005
    Location
    NSW
    Posts
    3,148

    Wink Re: Connector "how-to" question..

    Quote Originally Posted by BradW
    It doesn't appear to be either the QK or QL connectors according to the images in the links.
    Well, that's why I said 'appears to be' that connector , whether it actually is or isn't... because it's the closest representation there is.

    Regardless, the fan's wiring is sorted, as are a few other things in the engine bay now.
    Clicky -> THEN: 1999 RAV4/GT-Four Hybrid
    Clicky -> NOW: 1985 ST162 Celica SX (Gen III 3S-GE) - Kitted & Resprayed


    TRIKKE | Video

Similar Threads

  1. question for the board about selling items
    By EVOSTi in forum Toymods Car Club Membership and Feedback
    Replies: 6
    Last Post: 19-09-2005, 05:17 PM

Bookmarks

Posting Permissions

  • You may not post new threads
  • You may not post replies
  • You may not post attachments
  • You may not edit your posts
  •