
 Reply With Quote
another question, how much area should i be able to cover with about 0.5ltrs?


thanks for that man, ill give them a call
another question, how much area should i be able to cover with about 0.5ltrs?
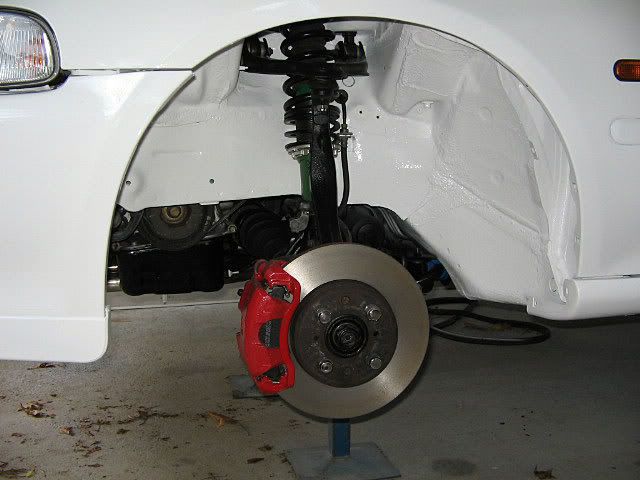
Hi guys, after some advise on gun set up.
Gun: Workquip P102G - yeah a cheapy
Tip sizes: 1.4, 1.8, 2.5mm.
Paint: Concept Paints 2-in-1 filler primer (acrylic)
This morning I had a shot with it and the primer just didn't seem to go on as wet as I'd liked. I was using the 1.4mm tip and 55psi. Instructions said start with 50psi. Mixture was 2 parts primer to 1 part thinner. I have a feeling I should have used the 1.8mm tip, however only a few weeks ago we sprayed my TA22 with the same primer, thru a Iwata gun with 1.4mm tip and it went on pretty wet... thus thought the 1.4mm would be ok with my gun.
When I put the paint on today, it just didn't seem to go on as wet as i wanted it to. So what should I try next (tomorrow)?
Bigger tip?
Different thinners mix?
Less pressure?
Any advise would be appreciated.
Cheers.
SHEPPO..

i've been spraying (same gun) that with 1.8 tip, mixed about 50/50, and with pressure much lower.. around 25-30psi.
that was at about 15deg air temp and went on well.
less thinner and higher pressure both resulted in not being able to get a good fan.
try lowering pressure to 25 and maybe even lower... at least low enough to get a full fan pattern
the colour goes on really nicely with the 1.4 tip..
Last edited by oldcorollas; 04-12-2011 at 12:22 AM.
"I'm a Teaspoon, not a mechanic"
"There is hardly anything in the world that a man can not make a little worse and sell a little cheaper" - John Ruskin (1819 - 1900)
AU$TRALIA... come and stay and PAY and PAY!!! The moral high horse of the world!
SHEPPO, your 2 in 1 is going to be much much thicker than an acrylic colour coat.
Bigger tip, lower pressure, and thinner mixture.
The air flow through the nozzle may also need adjusting.
Different gun will not be set up the same as the previous gun, takes a little practice to get all the gun and paint parameters in the green zone.
cheeers Chuck.
"What man can build, man can fix!"
MS51Crown Coupe,
GSV40R Aurion luxo tourer. One TA22 currently receiving some TLC prior to paint One RS56 Crown ute under construction, 2 x TA22's awaiting rebuilds. Toyota Crown RS47J ute in need of serious TLC. Toyota Crown Custom Wagon MS53 daily hauler stocko!
advice on under-body (seam) sealer and stone guard most welcome...
I've been aggressively de-greasing the underside of the garage barge RA65. Underside of car was completely coated with oil and auto-trans fluid. Removing the solid crap is resulting in much of the stone guard coming off and also some of the excess seam-sealer. The constant soaking of oil has made some of it brittle so it came away with the oil+mud+crud.
Am just wondering:
- how far should I go (given this is a uber-low-budget project) with regards to removing the existing stone guard? Just to a firm surface?
- what stone guard product to use that won't fall off if I spread it over the still slightly oily seam sealer?
Unfortunately the oil+mud coating looked much like the stone guard hence and there are now numerous scratches in the paint under the car - I obviously need to re-seal it to slow down the inevitable march of corrosion.
I'm trying to de-oil anything vaguely porous, and also chip off any dangly bits of stone guard & seam-sealer that might be collecting oil/degreaser/water.
Chuckster, you are on the right track. I use an engine degreaser gun with degrease then follow it up with some sugar soap and water from the same gun. A good rinse of with the gurnie high pressure washer and you are almost ready to paint. You have to get all the oil off, otherwise any paint or sealer will not stick. There is a brushable bitumous underbody sealer, K&H Brushable Underbody Sealer. I use this with a little turps and run it through a body shultz gun. Gives a better finish than the brush strokes. Any bare metal areas can be treated with some primer and colour from spray cans before the bitumen coat.
You could use as heat gun and scraper to remove all the underbody sealer, but I would just get rid of the soft stuff considering your budget.
Seam sealer is another product used only to seal panel joints. That stuff is just squeezed from the tube, can be quite expensive to do a full car, 50gram tubes are about $15.00 each.
There is another product to consider for a full underbody refurbishment, I found it when looking for a ute bed sray on liner. The stuff is a black 2 pack paint that contains rubber. Rust-Oleum Road Warrior Truck Bed Liner. This is also a brush on or roller application, but I have used it with the shultz gun with very good results. Would be ideal to do the rear wheel arches of most cars.
For information the body shultz gun has only one control on or off, you regulate the air pressure by kinking the hose. The gun has a nozzle that is about 10mm in diameter, it has to be that big to allow the ultra thick underbody sealer to flow out.
cheers Chuck.
"What man can build, man can fix!"
MS51Crown Coupe,
GSV40R Aurion luxo tourer. One TA22 currently receiving some TLC prior to paint One RS56 Crown ute under construction, 2 x TA22's awaiting rebuilds. Toyota Crown RS47J ute in need of serious TLC. Toyota Crown Custom Wagon MS53 daily hauler stocko!
Thanks chuck, I didn't think about sugar soap, it'll do a fine job of de-oiling. I know it works well in returning student-rental-share-house kitchens to a state vaguely resembling habitable.
The seam sealer that's been removed is just the excess stuff around the seam joins.
I might go for the bitumous underbody sealer as it'll help with rust protection. It should also tolerate any residual oil in the seams.
The guy who owns the workshop has some supacrap airgun bits and small compressor, but am fairly sure the largest nozzle will be way too small compared to a shultz gun. I do have some anti-rust stuff as I've already done around the spare wheel bin underside.
I recall MWP saying he put some bitumous sealer under one of his cars and added some sand to the mix?
Chucky, that Road Warrior Truck Bed Liner also had sand in it, probably for surface grip, so you dont go titstup. I see no value in sand in an underbody sealer except for texture. The Body Shultzgun was about $35.00 about 10 yaers ago from a discount tools shop. Has paid for itself time and time again. Oh yeah do nor forget to wear overalls with rubber gloves taped to the overalls,a rag hat and a full faceshield. You will look like a brother if you do not cover up. A few drop sheets under and around the vehicle to protect the floor if needed.
cheers Chuck.
"What man can build, man can fix!"
MS51Crown Coupe,
GSV40R Aurion luxo tourer. One TA22 currently receiving some TLC prior to paint One RS56 Crown ute under construction, 2 x TA22's awaiting rebuilds. Toyota Crown RS47J ute in need of serious TLC. Toyota Crown Custom Wagon MS53 daily hauler stocko!
Spraying underbody sealer is the easy way to do it but a PITA to clean up afterwards. You almost have to resign yourself to only ever using that gun again (with big tip) for that one job. I gave up on the cleaning and just paint the sealer on with a soft brush. Requires two coats with a fair bit of drying time in between but the result is always spot on.
As for spray gun technique, it's been pointed out before but again, a 1.8 to 2.0mm tip is best for acrylic and 1.4mm for 2pak. With primer - air pressure, mix and flow are all important to avoid that sandpaper finish. Coating should be wet off the gun for acrylic, and it should flash off rapidly. It's all in the practice.
I've done a couple of training sessions at VG Auto Paint in Girraween (as well as a TAFE course at St. George TAFE) and they all say the cost of a spray job is not in the materials but the "acquired expertise" of the painter. This is very true. So just keep practising and you will eventually succeed.
Concept Paint "Big Bad Orange" Acrylic No Clearcoat just buffed
Buffing materials and ROS
Light sand with 1000-1200 W&D
Acrylic straight off the gun
To finish
All done
Sorry - its a Honda but you get the idea.
The only time I ever sprayed 2Pak. Everything removable was done at St. George TAFE. Since this was a racecar I wirewheeled most of the underbody stuff off and painted it.
When I did the Hilux (Acrylic)
Heaps more info on painting in my old build thread
http://www.toymods.org.au/forums/eng...ts-pix%5D.html
Peter
Last edited by infotechplus; 07-12-2011 at 08:07 AM. Reason: Added link to build thread
OMG - Winner of the Official "Forum Comment of the Week"!
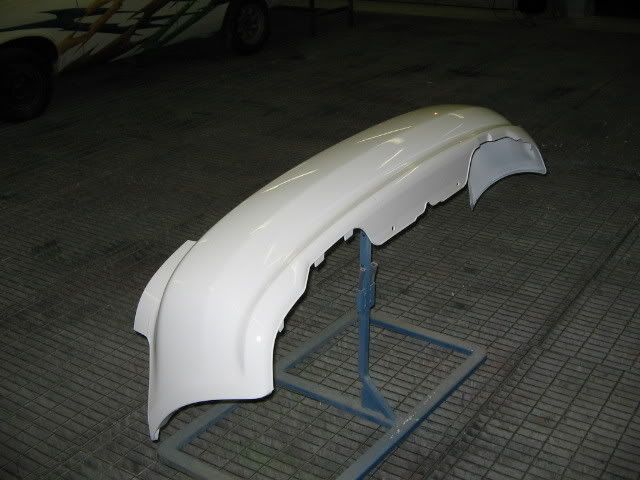
Depends on how much you thin it but if you use the recommended volumes, you should end up with a batch of paint just over a litre. Two coats on a bumper bar!Originally Posted by nuk1ear

But it also depends on the colour. For example, yellow will require three coats because legislation has removed much or all of the lead that gives yellow its coverage.
There is no hard & fast rule.
Peter
OMG - Winner of the Official "Forum Comment of the Week"!
Hey guys, we are just laying down the primer filler on my car but it seems to have no filling properties at all. We tried it first at the reccomended 4:1 ratio but couldnt seem to get it out of the gun right so we thinned it down a bit to 3:1 and now its running out nicely. It is not even filling the smallest marks even the tiny circles made by the orbital sander.
gun is gravity fed 1.8mm tip and at 40psi. Any tips? How many coats until it starts to fill the sanding marks?
What brand Primer Filler is it? I've never come across anything that needed 4:1 thinning. It'd be like water with no coverage so what you say makes sense. Using Concept Paints Primer Filler (or Primer Surfacer) its usually 1:1 or 1:1.5. I get good coverage with 2-3 coats (one really light and two heavy).
Also there are other factors relating to air pressure and gun setup. Too much pressure or air will have the paint dry before it even hits the panel. Too much paint (fluid) will produce runs. You should practice with the gun settings on a scrap panel until you get good flow, spread of paint, and a wet finish that goes off within a minute or two.
After using the orbital you should rub down with various grades of Wet & Dry (about 350 - 800 - 1200) until the surface is smooth to the touch. If you're having no luck try Spray Putty.
40 psi is a bit high but again it depends on how long the hose is from the compressor. You lose pressure the longer the hose. What is the compressor size/output/CFM?
Painting is not hard but it does take a lot of practice to do it right. You shouldn't be relying on the paint to cover your lack of attention to the job (sorry but I've been there and I've learn't that preparation is everything). Also remember that each layer of paint is only microns thick.
Have a look at the downloadable tip sheets here:
VG Auto Paints
Peter
OMG - Winner of the Official "Forum Comment of the Week"!
Its good now. we messed around a fair bit and finally got it running smooth. The 4:1 is off the tin, 4 parts paint to 1 part thinners... 80% thinners would be a waste of time surely.
http://a1.sphotos.ak.fbcdn.net/hphot...67700199_n.jpg
Actually really happy now there's about 4 or 5 spots that are going to need attention but the rest of the car came up nice.
hi mitch
ideally there should not be any marks left by the orbital sander
it needed a rub down with 600# grit then 800 before the primer was sprayed on
use a trigger pump pack spray bottle full of water . spray it on the panel and then look along it
it will show up any imperfections as it looks like clear coat in the right light
BUT dont forget to wipe it off A S A P , so it does not absorb in to the job
cheers
ian
nostalgia is not what it used to be:
 Posting Permissions


Bookmarks