
 Reply With Quote
You just like me spending all my house savings dont you Peter?
Count me in
Andrew


I went up to RoadRunner today and Linden has given me a loan of his setup.
The R32GTR/R33GTST caliper fits over the BA falcon disc nicely. You need an 8mm spacer on each of the caliper bolts to sit the caliper evenly over the disc. the original Hilux caliper bolt will go on but for safety-first Linden suggested a slightly longer bolt.
His setup has a nicely machined hub spacer which locates the disc on the axle. I'll post some specs of this spacer, the longer bolts and the 8mm spacer later.
Actually this might make a good conversion kit -
- 2 x 8mm spacers,
- 4 x longer bolts and spring washers, and
- 2 x hub spacers.
I wonder if there would be any interest?I could get a quote from the workshop to make the spacers and hub spacers, and get the bolts from the Bolt Shop.
This is quite a simple conversion, all up. Thanks to SSS Automotive and Linden @ RoadRunner for their help in sorting this.
Cheers,
Peter
Last edited by infotechplus; 07-07-2007 at 06:01 PM.
OMG - Winner of the Official "Forum Comment of the Week"!

You just like me spending all my house savings dont you Peter?
Count me in
Andrew
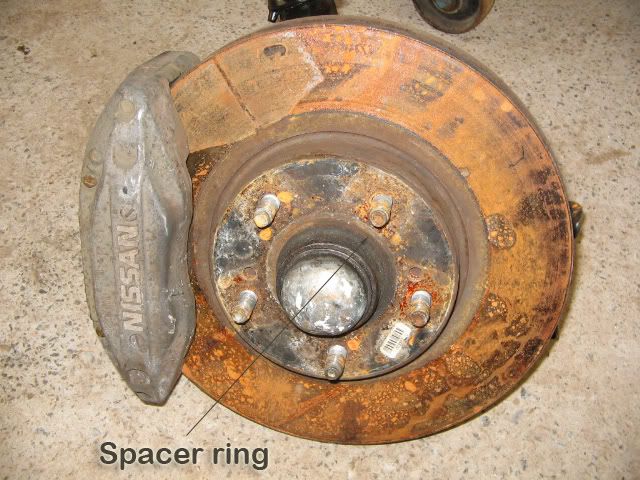
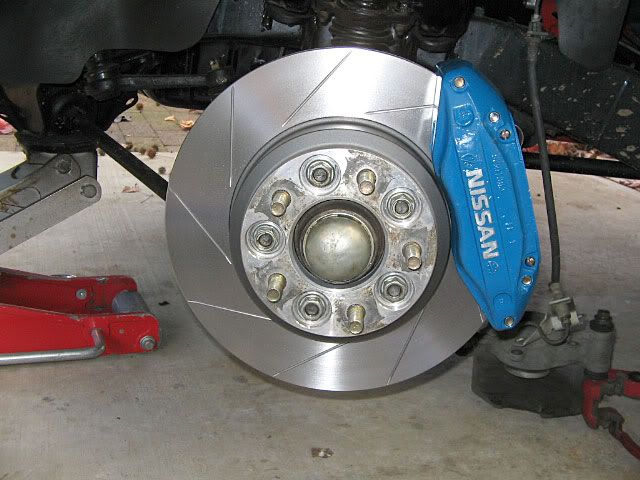
This is the hub I borrowed off Linden (The_Real_Roadrunner).
It's a Nissan R33 GTS-T setup not the Falcon BA but it will serve as a good illustration of what's required. Also anyone wanting to do this upgrade instead of the BA Falcon will have all the info.
I matched the GTR32 caliper I borrowed from SSS Automotive to this caliper and we confirmed them as being the same. So you can use either in this upgrade (Falcon BA rotor) or use the Nissan R33 GTS-T disc. The mounting of each might be different but I'm concentrating on the BA setup. I can post dimensions and weights of this R33 GTS-T setup later.
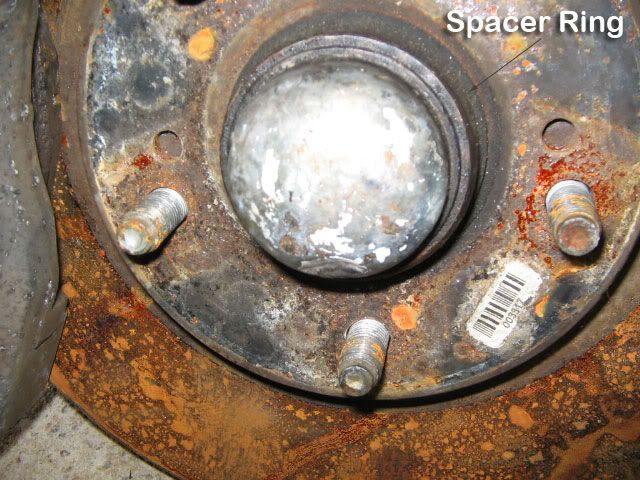
Here's the full hub indicating the placement of the hub spacer.
I haven't got exact dimensions but it will be based on:
R33GTS-T rotor opening (R33_ID) - Hilux axle width (H_OD)
A quick vernier check says it's 3mm thick.
I'll disassemble the hub later today and if I can get a better measurement of the hub spacer I will post it here.
Here's a closer view of the hub spacer:
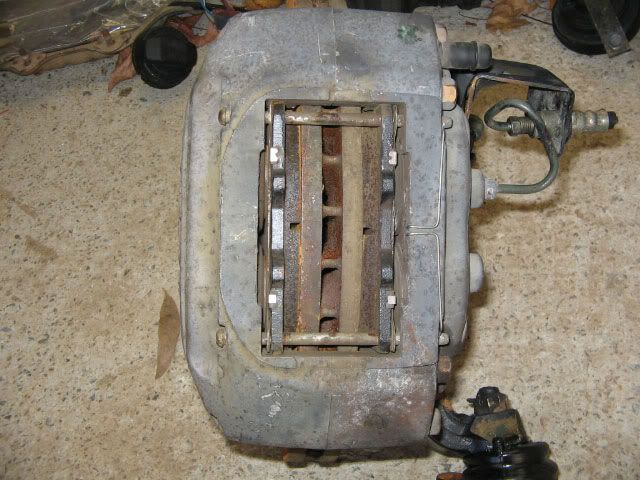
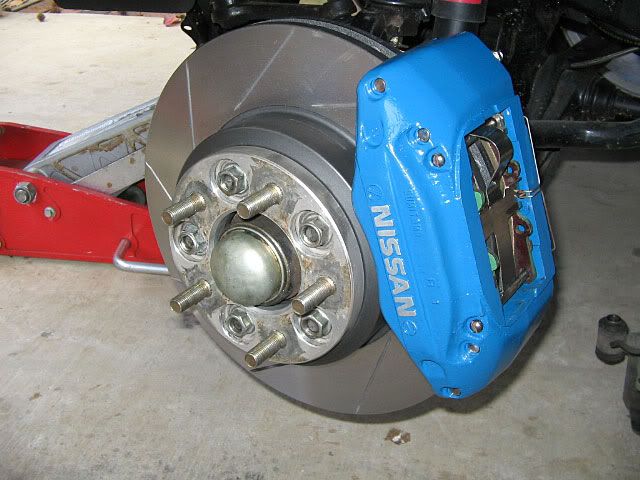
The caliper should sit evenly over the rotor as in the next photo:
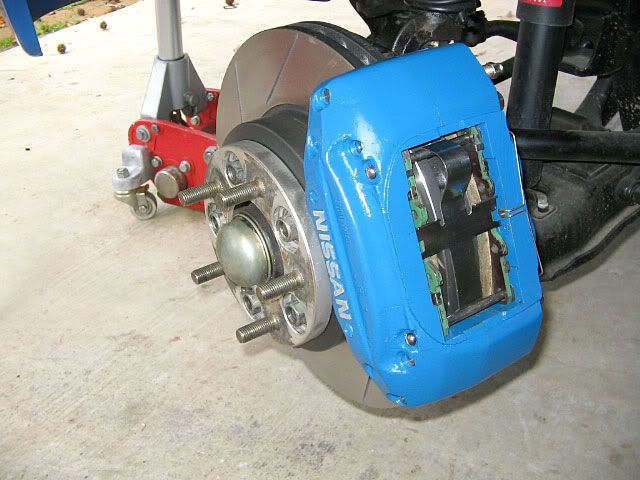
And from the other side:
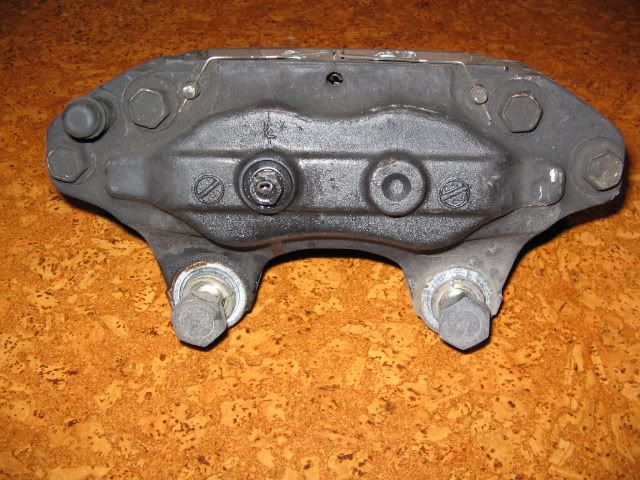
Here's the caliper spacer:
It's a one-piece block 140mm L x 30mm W x 20mm D. The bolt spacing is 100mm.
This is, of course, just one way of doing it. You could also make the caliper spacers two individual pieces, perhaps circular for a more factory-looking finish.
Cheers,
Peter
Last edited by infotechplus; 02-07-2007 at 10:33 AM. Reason: Typo!
OMG - Winner of the Official "Forum Comment of the Week"!
With that spacer, I'd be a lot more comfortable with the solid bar, it give you a nice load sharing between the two mounting ears.Originally Posted by infotechplus
Strange things are afoot at the circle K
I read somewhere i think in the other brake conversion thread, that you actually need to use a solid bar. Apparently engineers dont like you using single spacers.
Correct me if im wrong.
Thanks
Andrew
There shouldn't be much in it strength wise, spacers may induce a turning moment on the lug, and for the minor weight penalty a solid bar is probably a better thing.
If you want it to look factory, having Nissan written on the side of the calipers is more of a worry....
Strange things are afoot at the circle K
Whoops - wrong thread. OD'ed on tea!
Cheers,
Peter
Last edited by infotechplus; 03-07-2007 at 06:02 PM. Reason: My stupid
OMG - Winner of the Official "Forum Comment of the Week"!
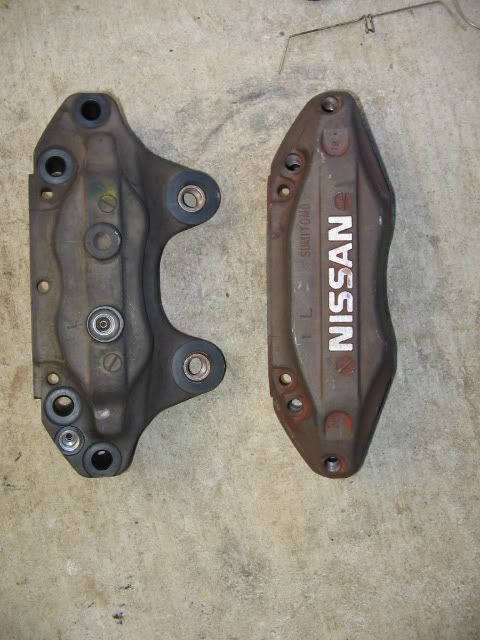
Hey bro, on the left caliper the inlet is on the Left (with a L above it) on the right its on the right (with a R above it).
Only way to tell the difference between the calipers is by measureing the space inwhich the disc fits - thats if they are the ribbed type. The smooth type are always R32GTR/R33GTST.
^^^
and the difference in the slot for the disc on the ribbed versions (r32gtst-300zx) is the non turbo 300zx still ran 4pots but only a 26mm disc
cheers
linden
Weights (scales calibrated)
Hilux rotor (rotor only): 5.9kg
R32 GTS-T rotor: 7.4kg
BA Falcon: 8.7kg
Caliper (no pads)
R32 GTR: 3.1kg
R32 GTS-T: 2.8kg
Set of R32 pads: .7kg
Cheers,
Peter
OMG - Winner of the Official "Forum Comment of the Week"!
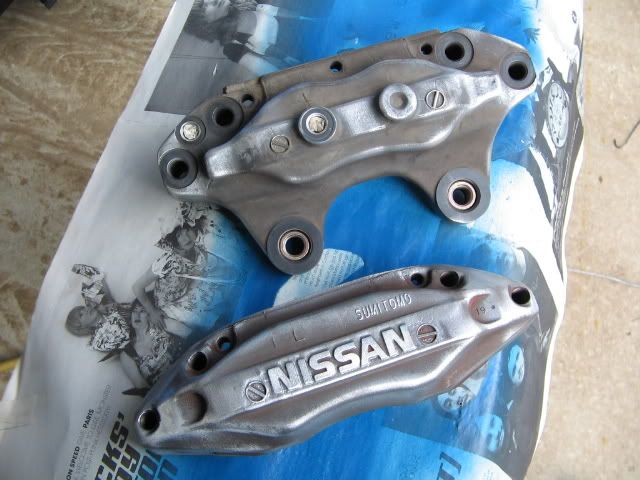
Here are some more reference pictures of R33 GTST calipers for you:
The Nissan logo can be ground off easily
Spacer ring
Installed, albeit on an MX83.
Its the same conversion you just need to backspace the caliper so it aligns.
Also, according to the DBA cattledog the overall hat height on the BA disc is 12mm higher than the R33 disc. Which means that you only need an 8mm spacer for the Hilux to backspace the caliper. The MX83 on the other hand only needs a 1mm spacer.
-Chris | Garage takai - Breaking cars since 1998
Sparky - AE86 IPRA Racer | RZN149 Hilux - Parts and Car Hauler
I never saw a wild thing sorry for itself. A small bird will drop frozen dead from a bough without ever having felt sorry for itself. - D.H.Lawrence
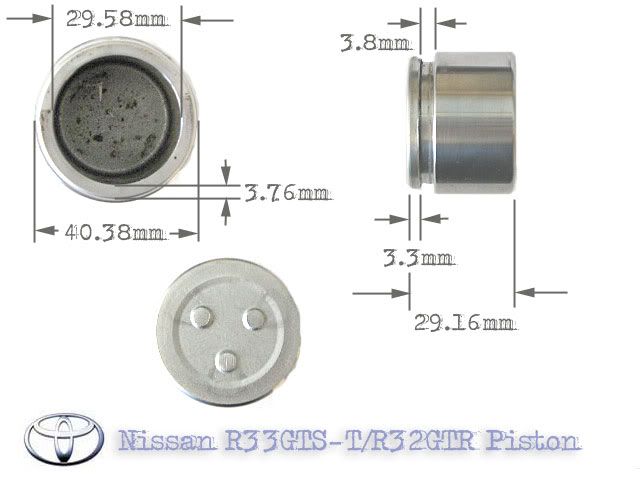
Someone asked about piston measurements so here's some info from the Nissan R32-GTR & R33 GTS-T piston:
Hope this helps out,
Cheers,
Peter
OMG - Winner of the Official "Forum Comment of the Week"!
I bought a set of Nissan R33 GTS-T calipers off Ebay earlier in the week ($255 a pair) and they were in very good condition, including pads. I already had a much better set of pads but I'll keep the ones off these calipers as spares.
I've stripped one down, checked the pistons for wear and the bores for rust, but everything was good. That's one of the pistons in the measurements above!
Now I've rebuilt the piston. I always use PBR Rubber Grease to clean and lubricate the rubber parts including the two small O-rings inside the caliper, the boots and the piston internal gasket rings.
All the small metal parts - clip, bolts, plates etc were cleaned with brake cleaner and a brush before refitting.
I wiped the rotor down as per instructions, and mounted the caliper temporarily (I'm having some 8mm thick spacer bars (8 x 140 x 20mm) made up).
Here are some photos:
This photo shows the metal spring that holds everything firmly in place.
There are also two sets of plates - one is pressed with ribs on the inside with a chromed ribless outer. There is also a small horseshoe clip that goes down on one side of the front of the pad probably to cushion forward movement of the pad.
They're at the top of the next photo, on either side.
Over the weekend I'll rebuild the other side, and get the braided lines made up. They'll only be short ones to replace the rubber lines there at the moment.
Cheers,
Peter
Last edited by infotechplus; 11-08-2007 at 03:40 AM. Reason: Measurements corrected: Thanks Linden.
OMG - Winner of the Official "Forum Comment of the Week"!
How to paint your calipers
I thought some of you might be interested in the process of painting your calipers. I know it's been done before but, hey, I got the photos and I'm gonna use them!
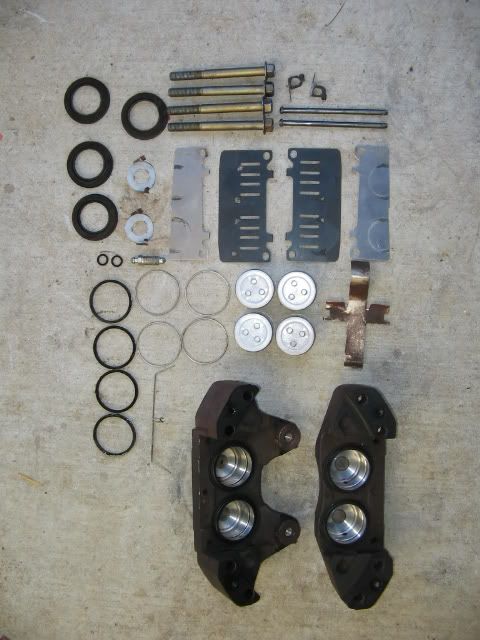
First, I removed the four pistons from the caliper. I use compressed air to pop them out. You have to be careful as they can really fly out if you are not giving it your full attention. And never put your hands inside the piston to try and catch it. Use a small towel to dampen it down.
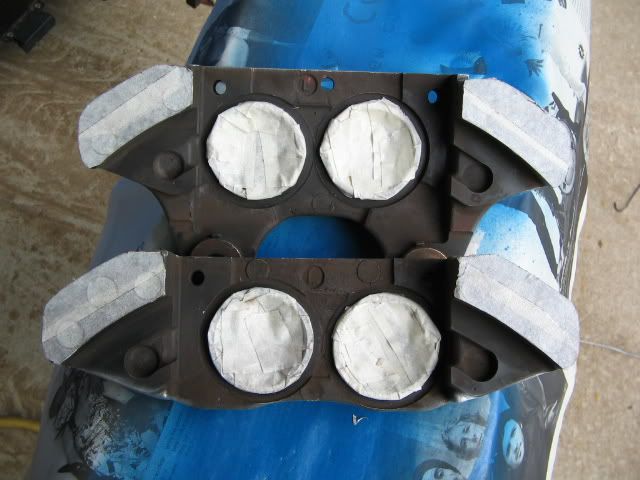
Here's the R33 GTS-T rotor completely disassembled and washed with brake cleaner, follwed by compressed air drying, and the once over with W&GR:
Make sure you keep everything together as you don't want to lose any clips or rubber O-rings. These ones were like brand new! I use the 5 Litre ice cream buckets (and, yes, with three kids we eat a lot of ice cream)
The guy who sold these calipers on Ebay painted them very quickly with red paint - a very untidy job but the W&GR quickly cleaned them up. Here's the two halves after drying.
I also run the caliper halves under the wire wheel just to clean up a few nicks:
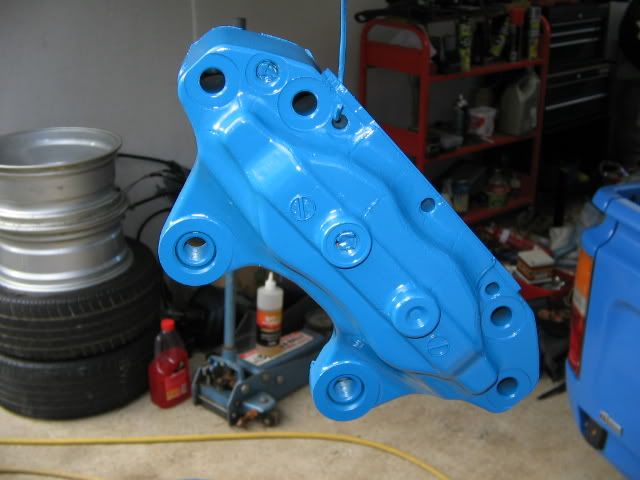
The next part of the job can make or break your paint - masking up. You need some masking tape (obviously), the Supercheap stuff will do, a sharp blade and your choice of caliper paint colour. I'm sticking to the blue theme as on the back.
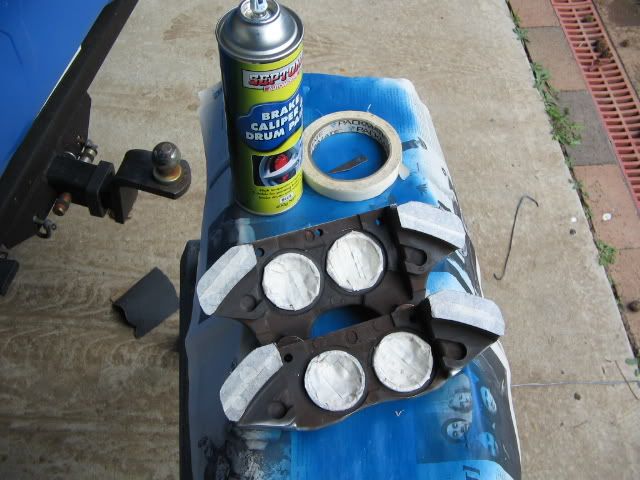
I mask off the piston bores by going around the circumference and folding into the centre, then longways until the hole is fully sealed. You don't want any paint in the piston bore!
I also mask off the mating surfaces of each half. Trim off the excess with the sharp blade.
The other place to mask is the threaded holes used for the brake line and bleeder valve, on the outer side. Here you can see I've pushed some masking tape in the two holes:
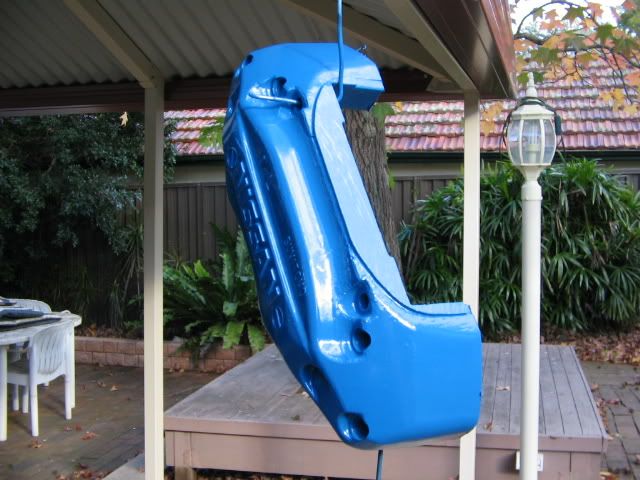
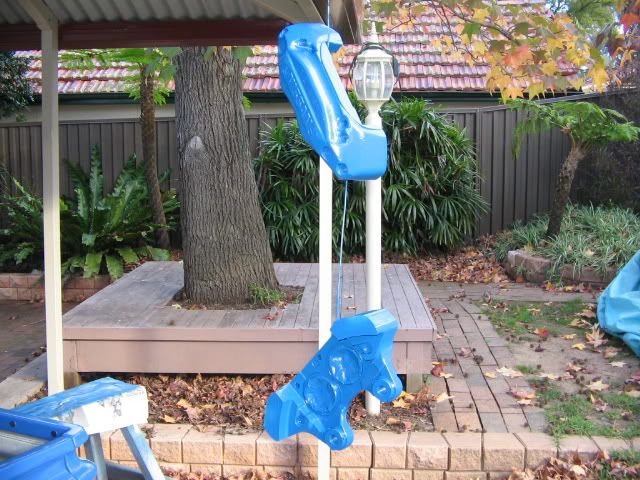
You can hang your piston halves off coat hangers or lay them down on a flat surface for painting. I lay them down to do the outsides and then hang them to do the insides.
Give each side a light coat, wait 5 mins for it to tack. I use a heat gun to speed up the process. Then give each side another coat, wait, then a full coat to get that gloss finish. The heat gun also lets you cover any runs as the paint flows out. But don't be heavy-handed as you'll ruin the job.
I like to remove the masking after about 10 minutes so there's little chance for gum residue off the tape.
Now I just wait until tomorrow to reassemble everything. As I said before, all rubber parts will be treated with PBR Rubber Grease before reassembly. I also coat the pistons with brake fluid to make it easier to pop them back into their bores.
Hope you enjoyed this How To,
Cheers,
Peter
Last edited by infotechplus; 09-07-2007 at 02:27 PM.
OMG - Winner of the Official "Forum Comment of the Week"!
Uh, i hope you enjoy shuddering discs.
The EBC Greenstuff pads are horrible with DBA slotted discs. Resin off the pads leech onto the disc and build up in small ridges on the trailing edge of the slot. Causes a shudder akin to warped discs.
Go some DS2500s, you know you want to
-Chris | Garage takai - Breaking cars since 1998
Sparky - AE86 IPRA Racer | RZN149 Hilux - Parts and Car Hauler
I never saw a wild thing sorry for itself. A small bird will drop frozen dead from a bough without ever having felt sorry for itself. - D.H.Lawrence
 Posting Permissions


Bookmarks