Results 1 to 14 of 14

Thread: HIDs for Dummies, A review of E-bays finest.

  1. #1
    80's Style'n Backyard Mechanic VA61DETT's Avatar
    Join Date
    Jun 2008
    Location
    WA
    Posts
    252

    Lightbulb HIDs for Dummies, A review of E-bays finest.

    Part 1 The KS-04 Woes

    Now I have finally finished off the bulk of the restoration on my AW11 I can turn my attention to some of the smaller things.
    I really wanted to upgrade the headlights, as the previous, previous owner had done some shoddy looking 100W upgrade with relays & wires running all over the place.
    I hacked all the wires out & returned the harness to factory condition while the car was stripped down.
    I am currently running the stock 50/55w H4 units for now, but they are a bit feeble.
    So yeah, let’s get some HIDs.

    I know some people hate on the idea of running these in stock reflector headlights, but if you adjust the lights correctly & keep the lenses clean, there should be no issues.
    So I purchased this no-name generic 35W / H4 kit about a few months ago for around $50.


    The first thing I found right out of the box was one of the units rattled, oh yeah that’s not good :/
    Upon disassembly I found there was a 4.7uf 400v capacitor that had broken off the board & was noticeably swelled up at the base. Some awesome QA there…
    Anyway I bought a few replacements from RS & soldered a new one in, I also removed & inspected the other larger 1000uf 25v capacitor.
    Here is a shot of the board. The broken capacitor was the one amongst the 2 big red poly caps in the HV circuit.


    Track Side, the soldering was pretty terrible so I fixed up the worst joints.


    The silicon goo was actually pretty easy to remove & could be brushed off with-out damaging the SMT components. I plan to re-seal the board with PCB lacquer prior to installation.
    The larger components really need to be stuck down better with silicon or potting compound.
    The power FET is wedged onto the case heat-sink with a spring clip against the switching transformer. This is not a very well made board… But at least it’s easy to fix!

    The lamp is a combined HI-LOW H4 unit which utilises a solenoid arrangement to pull the lamp into alignment with the gap in the reflector shield to act as the high beam mode.


    The connectors appear to be fairly standard for all the china kits I have encountered.
    2 sealed high voltage lines & the small ‘high beam’ connector for the solenoid.


    Next: Testing & Wiring.

  2. #2
    80's Style'n Backyard Mechanic VA61DETT's Avatar
    Join Date
    Jun 2008
    Location
    WA
    Posts
    252

    Lightbulb Re: HIDs for Dummies, A review of E-bays finest.

    Part 2 Got lumens?
    Mini disclaimer here: DO NOT LOOK INTO THE LIGHT!
    All gas discharge lamps emit loads of UV, it’s about as bad as looking into welding flash! Wearing eye protection is a must when handling these.
    If they go pop you are going to have a bad time!

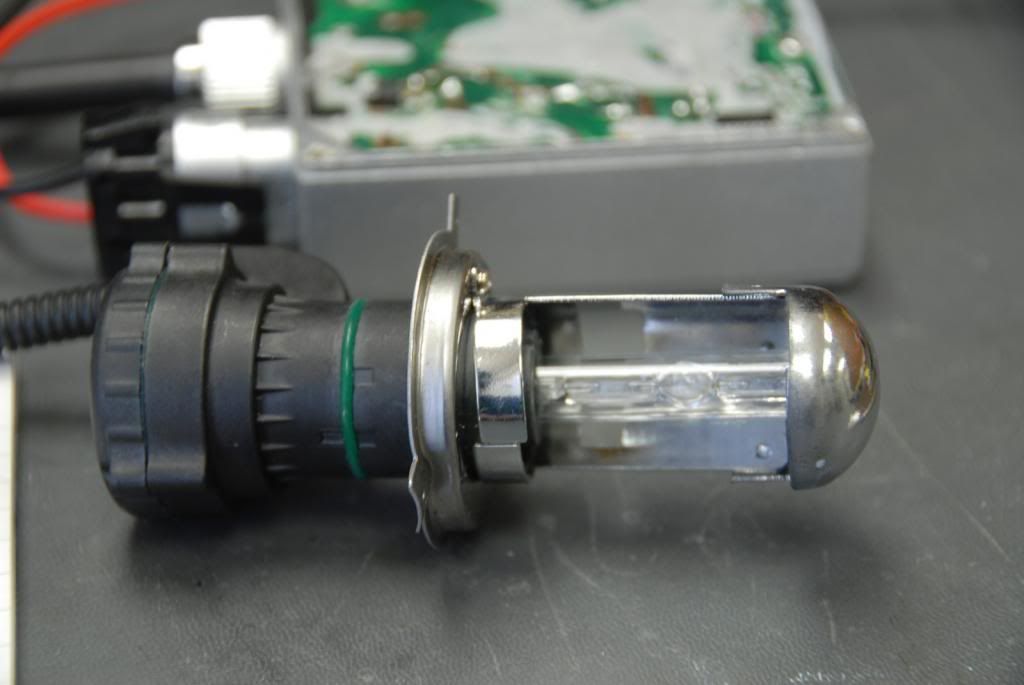
    They also get VERY HOT!
    For bench testing I ran the lamp on top of a metal box with a fan & black shroud around it to duct the hot air away.

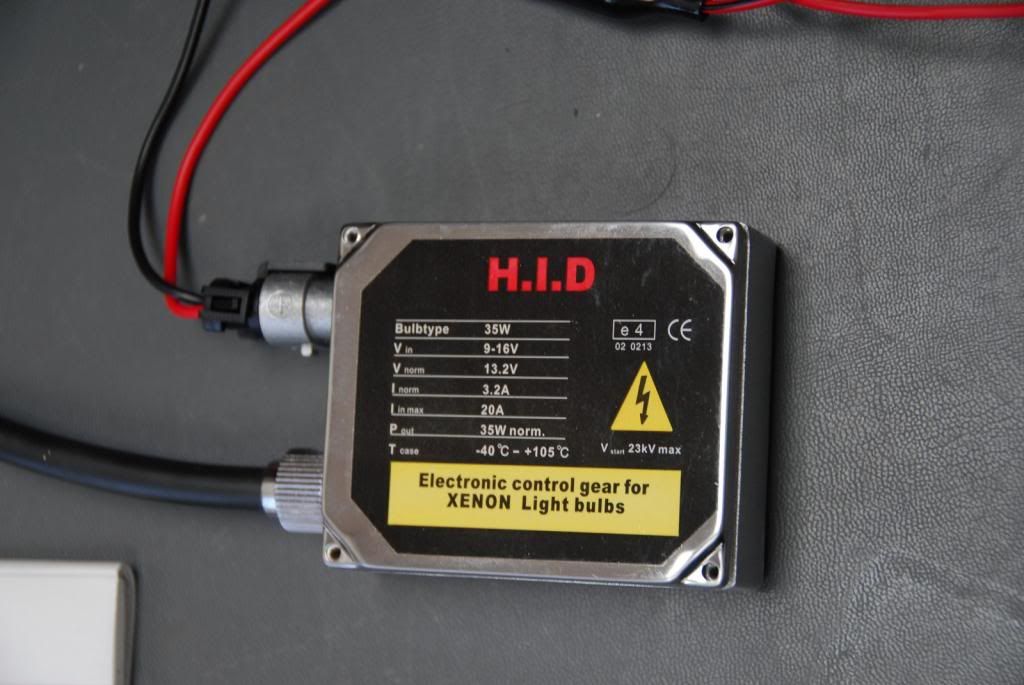
    HIGH VOLTAGE WARNING!
    There can be up to 20KV on the pointy end of the lamp plugs.
    The run voltage can be around 200v DC which is also not much fun to stick your finger on!

    Ok that’s out of the way…
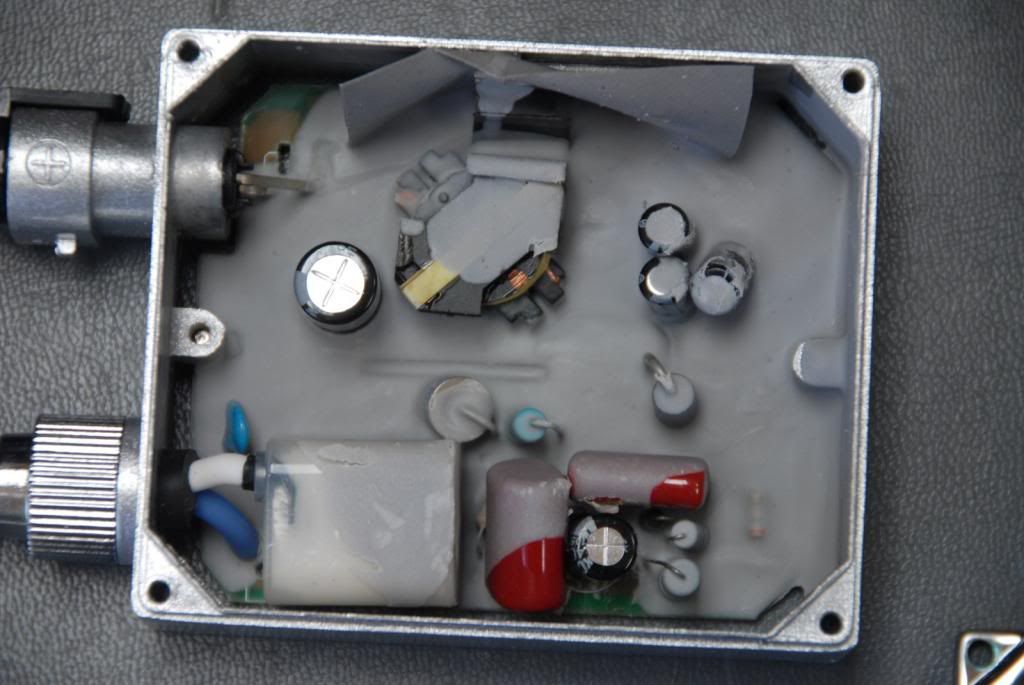
    So after fixing my new parts I decided to do some testing & active component analysis, just for fun!
    For my test rig I used an 8A 12V linear bench supply with a 0.1ohm 20W resistor in series with the ballast circuit for current waveform measurement.
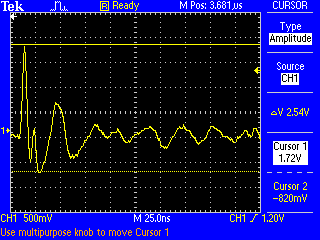
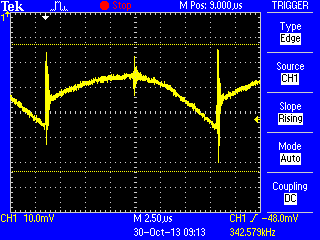
    I had loan of a Tektronix TDS2012B storage scope to make the readings.
    Running the unit at 12v has a very brief spike up to 25A <25us then stabilises at 3.93A within 10 seconds or so. The lamp reaches full brightness within 30 seconds.

    Inrush spike across 0.1ohm resistor lead at x1


    It will keep running down to about 8V, the current gradually increases to ~5A, where it will eventually flicker & go-out.
    It won’t re-start till the voltage is removed and higher voltage is re-applied.
    It will start at 9v reliably, but the brightness stabilisation time is longer.
    Running it up to 14v the average current decreases to 3.2A.

    Current ripple at 12v/3.9A:


    It generates a fair bit of switching noise, but probably pale in comparison to ignition coils.
    Voltage ripple:


    The audible noise is almost non-existent, which is surprising given the ‘quality’ of the board.
    Many other units I have seen are quite buzzy when powering up from cold.
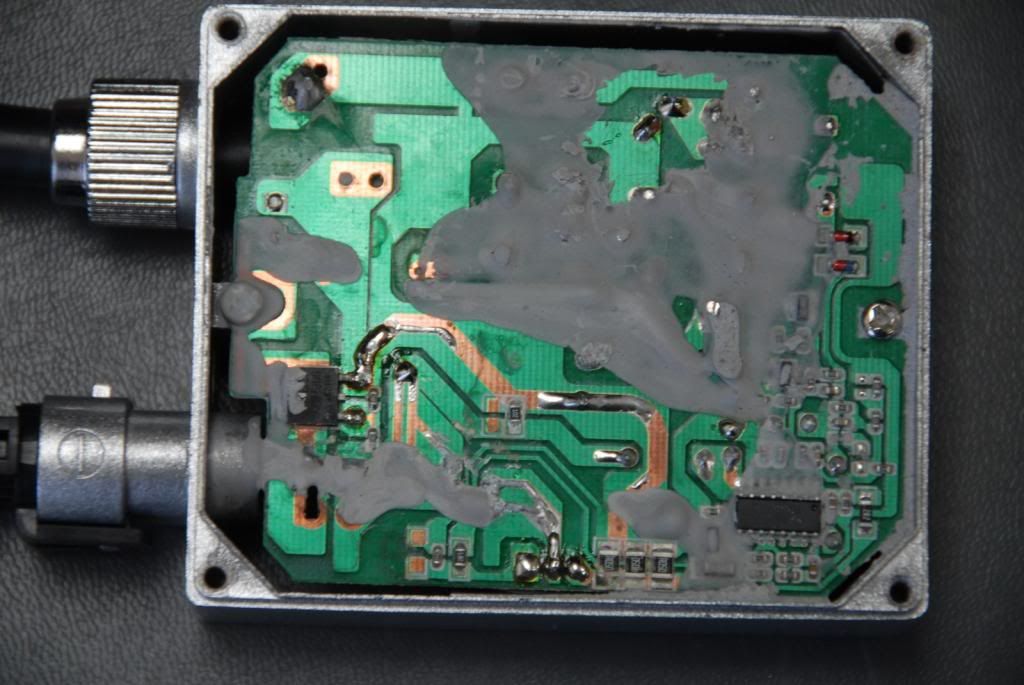
    I inspected the voltage on the lamp supply where the defective 4.7uf cap was attached to, this only rose up to about 70v, so I’m not too sure why they have an oddball 400v cap there.
    Maybe it sees some transient spikes during ignition?
    Despite the build quality it appears to perform quite well, the lamp starts first time every time without sending the power-supply into current limit.
    The lamps are very stable with no flicker (though will be interesting to see how this goes on-car).
    The case gets a little warm after a few minutes of use, but not concerning amounts.

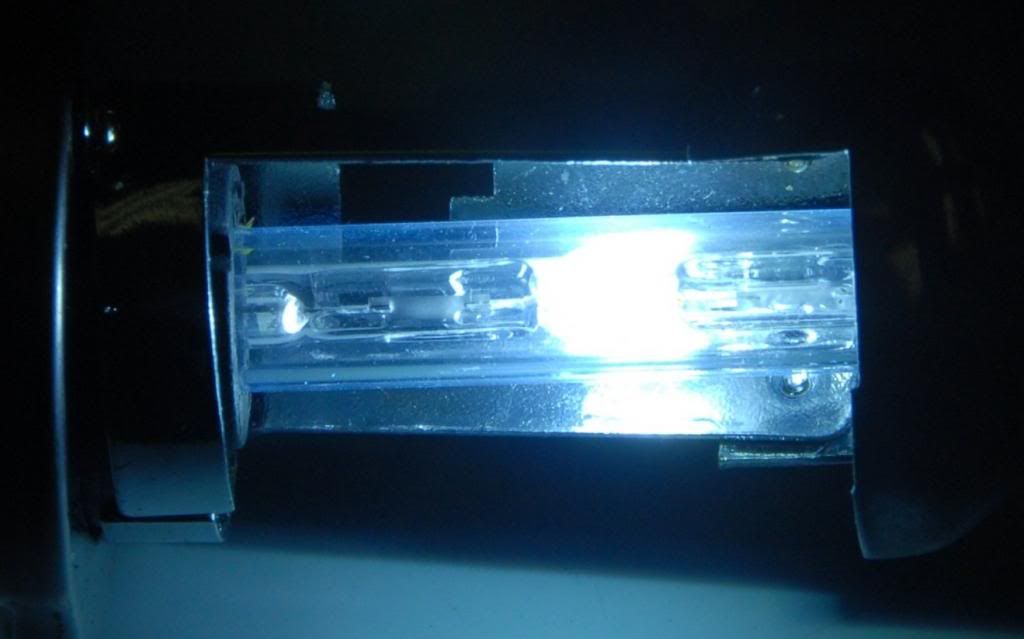
    Close-up of the running lamp, UV filtered:


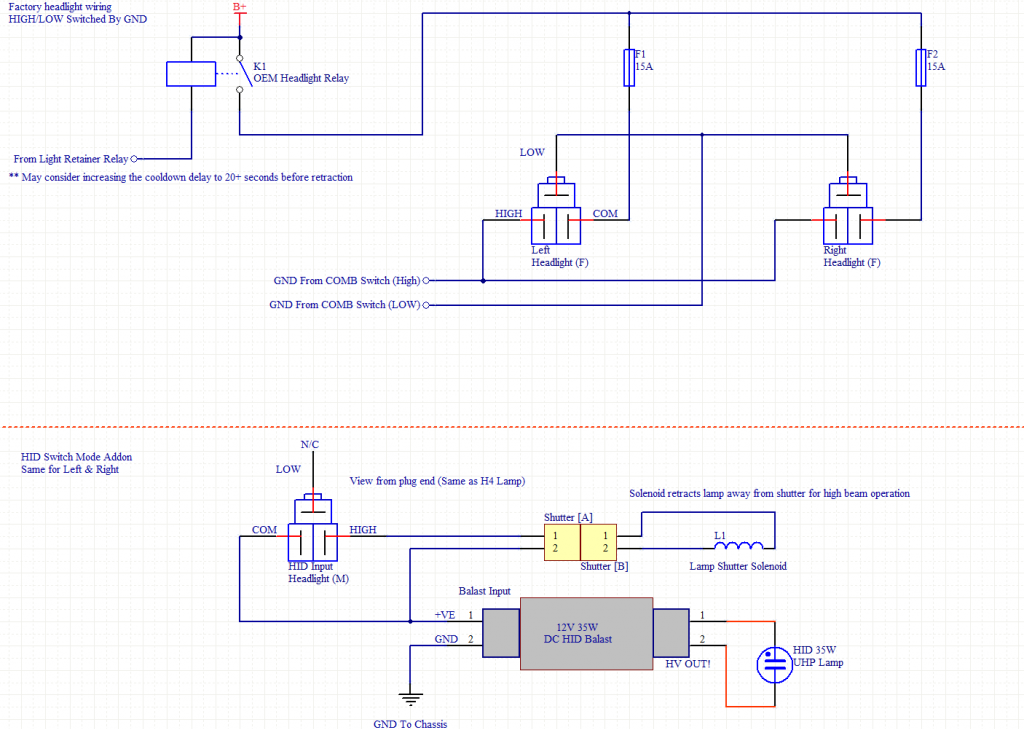
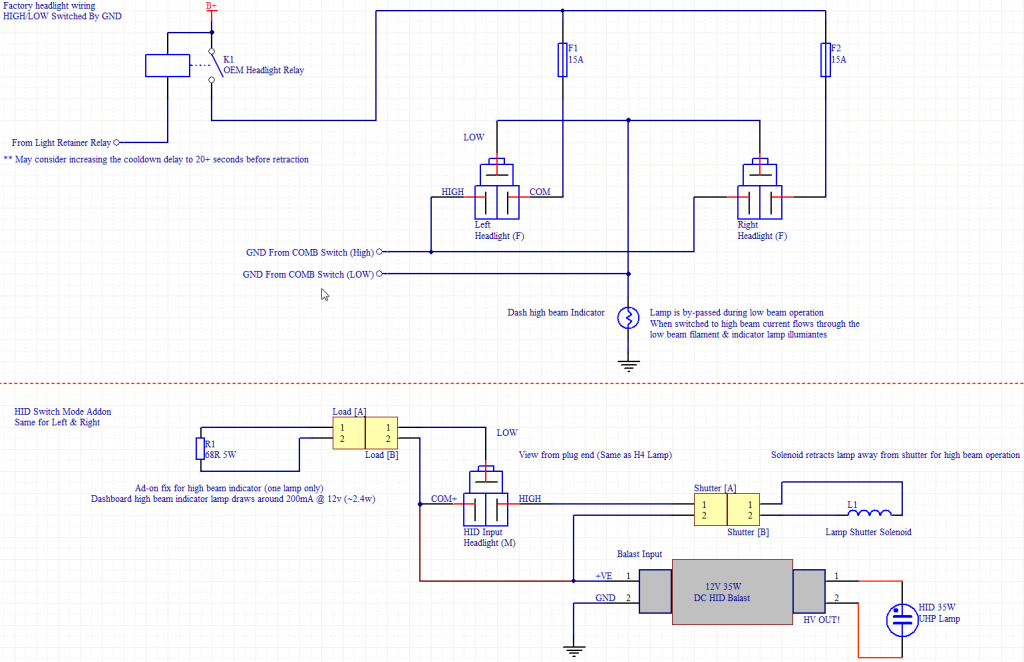
    Next, onto the vehicle wiring

  3. #3
    80's Style'n Backyard Mechanic VA61DETT's Avatar
    Join Date
    Jun 2008
    Location
    WA
    Posts
    252

    Lightbulb Re: HIDs for Dummies, A review of E-bays finest.

    Part 3 Wires, wires wires…
    Ok, the number ONE gripe I have with these HID kits is the fugly wiring arrangement they supply you with.
    They expect you to run a new +VE lead with cheep as cheep single fuse assembly & sub-standard dual relay assembly.
    Result?
    Something goes wrong? You lose ALL of your headlights in one go…
    Just un-acceptable!

    So after analysing the requirements & looking at the Toyota wire diagrams, the whole lot can be made far less complicated while still maintaining the redundancy of independent lighting circuits.

    BAM!
    Minimal wire mods, maximum awesome!


    The only extra wire required is the chassis ground fly lead, make sure to clean off the paint & ensure good solid connection.
    I always use a dab of conductive joint grease on the bare metal & terminal when connecting. It’s good stuff & prevents the connections & bodywork going rusty.

    Now there is a specific thing to consider when using HID lamps in a pop-up headlight application.
    Gas discharge lamps do-not like to be run off axis by more than a few degrees.
    There are issues with the gas vapour condensing on the electrodes if up ended, which shortens the life & may make them hard to start or even cause ballast damage.
    (I know this through my work with Barco simulation projectors).

    So you don’t want them running till the lights are all the way up & you will want to give them adequate cool-down time before the lights are retracted.
    Fortunately MR Toyota was also aware of the issues of moving hot lamp filaments & incorporated a lamp delay system into the retractor circuits.
    This part is currently work in progress, but I intend to modify the delay circuit for an extended cool-down cycle before the lights are retracted, watch this space!

  4. #4
    RZN169R+2JZGTEVVTI+R151 Domestic Engineer madmont's Avatar
    Join Date
    Nov 2005
    Location
    Queensland
    Posts
    669

    Default Re: HIDs for Dummies, A review of E-bays finest.

    When I did mine I added a resistance in the form of an old relay between the low beam control wire and the common power wire so that the high beam indicator will work.
    Jealousy is a curse

  5. #5
    80's Style'n Backyard Mechanic VA61DETT's Avatar
    Join Date
    Jun 2008
    Location
    WA
    Posts
    252

    Default Re: HIDs for Dummies, A review of E-bays finest.

    -madmont

    Good idea, I haven't tested the high beam indicator yet, noted.

  6. #6
    RZN169R+2JZGTEVVTI+R151 Domestic Engineer madmont's Avatar
    Join Date
    Nov 2005
    Location
    Queensland
    Posts
    669

    Default Re: HIDs for Dummies, A review of E-bays finest.

    It may seem a bit strange having the high beam indicator connected to the low beam wire but that is how it works.
    Jealousy is a curse

  7. #7
    Chookhouse Chooning Automotive Encyclopaedia Hen's Avatar
    Join Date
    Oct 2005
    Location
    Victoria, Mt Macedon
    Posts
    1,134

    Default Re: HIDs for Dummies, A review of E-bays finest.

    Impressive work you're doing to that kit.

    I was pleasantly surprised with the el-cheapo HID kit I got from eBay. The bulb and plugs look very similar to yours, though the ballast looked more crummy. I installed it on my motorbike and flogged it for 6000km offroad without any problems. Sure, it reset my digital trip meter/speedo every time I turned it on (hadn't run a dedicated power feed to it), but it gave plenty of light.
    I need a working 4AGE bottom end. Pref smallport GZE, but all others considered. Also complete motors.
    Drift Volvo. Was fun. 2JZ next time.

  8. #8
    Junior Member Conversion King timbosaurus's Avatar
    Join Date
    Feb 2006
    Location
    Melbourne
    Posts
    2,037

    Default Re: HIDs for Dummies, A review of E-bays finest.

    Lol, been through the same thing with the same kit. Everything was impressive except:

    The connectors and terminals are typical cheap shit made of cardboard. Some of the terminal tangs were not even strong enough to hold the terminals in during connection. I replaced them with something reliable.

    The relay box designed to be mounted outside is in no way waterproof.
    Current rides...
    2) White RA25ST
    1) Red RA28LT (NOW WITH 1G )

  9. #9
    80's Style'n Backyard Mechanic VA61DETT's Avatar
    Join Date
    Jun 2008
    Location
    WA
    Posts
    252

    Lightbulb Re: HIDs for Dummies, A review of E-bays finest.

    Ok,

    Finally got some time last week to finish off the installation.

    As madmont noted you do indeed need some resistance between the low-beam and common for the high-beam indicator to work.
    One of these very strange toyota wiring oddities...

    See revised OEM to HID circuit:


    All the bits tucked up inside the light lid:


    Still yet to mod the retractor relay, but I am sure it wont be too difficult to increase the cool down delay.
    Last edited by VA61DETT; 24-11-2013 at 02:31 AM. Reason: fix link

  10. #10
    NICE VIBE Backyard Mechanic marvis's Avatar
    Join Date
    Aug 2008
    Location
    Queensland
    Posts
    471

    Default Re: HIDs for Dummies, A review of E-bays finest.

    Good read.

    I was going to get some HID, but decided to get some polarg bulbs instead.

  11. #11
    80's Style'n Backyard Mechanic VA61DETT's Avatar
    Join Date
    Jun 2008
    Location
    WA
    Posts
    252

    Default Re: HIDs for Dummies, A review of E-bays finest.

    On a side note,
    Came across these the other day too:
    http://www.jaycar.com.au/productView...9&form=KEYWORD

    Noticed a few popping up on ebay....
    Will be interesting to see how well they do, the instant-on appeal sounds good!
    Should be very durable too.

  12. #12
    RZN169R+2JZGTEVVTI+R151 Domestic Engineer madmont's Avatar
    Join Date
    Nov 2005
    Location
    Queensland
    Posts
    669

    Default Re: HIDs for Dummies, A review of E-bays finest.

    I am a bit doubtful about the 68 ohm resistor. Bear in mind that when the lights are on low beam it will have 14v on one side and earth on the other side.
    Jealousy is a curse

  13. #13
    80's Style'n Backyard Mechanic VA61DETT's Avatar
    Join Date
    Jun 2008
    Location
    WA
    Posts
    252

    Default Re: HIDs for Dummies, A review of E-bays finest.

    Yer the resistor is a bit of a hack...

    I measured the current flow through the dash high beam lamp to be about 200ma ~ 2.5w @ 12v
    The resistor will need to be at least 5W to make sure it dose not burn!

    I am thinking I will replace the indicator with a suitable blue LED (next time I have the dash out).
    This way I can increase the resistance to about 750 ohms & not need to worry about baking stuff! (part of the reason it is on a separate little plug)

  14. #14
    80's Style'n Backyard Mechanic VA61DETT's Avatar
    Join Date
    Jun 2008
    Location
    WA
    Posts
    252

    Default Re: HIDs for Dummies, A review of E-bays finest.

    Ok,

    As usual being slack has cost me...

    First lamp failure after less then 20 hours of running...


    The right side electrode has vaporized.
    This is where the vapour would have condensed when the light was flipped down.
    Now it wont start at all....

    Better get off my ass & sort the time delay.

    -A

Similar Threads

  1. Question About 2009 Toyota Camry Grande HIDs
    By stretch in forum Tech and Conversions
    Replies: 12
    Last Post: 20-11-2011, 10:49 PM
  2. Suspension for dummies
    By Lambolica in forum Tech and Conversions
    Replies: 12
    Last Post: 13-09-2007, 08:38 PM

Bookmarks

Posting Permissions

  • You may not post new threads
  • You may not post replies
  • You may not post attachments
  • You may not edit your posts
  •