Results 1 to 15 of 15

Thread: Guide: Changing Valve Shims on a 7MGTE

  1. #1
    Kamber King Conversion King Negative Boost's Avatar
    Join Date
    Oct 2005
    Location
    Sydney
    Posts
    2,158

    Default Guide: Changing Valve Shims on a 7MGTE

    Guide: Changing Valve Shims on a 7MGTE

    This is a guide on changing the Adjusting Valve Shims on the 7MGTE. To give those of you that do not know what these shims are, here’s a picture taken from the Cygnus X1 online TSRM.


    Here’s another great link which also guides you through the process of changing the Valve Shims on the Sandia Supras website.
    I thought I’d write about my experience and add some pictures along the way to help others visualise it. Here it is.

    1. Disconnect the negative terminal on your battery since you will be turning the engine over by hand and you don’t want an accident to happen when you’re doing this. Also jack the front of the car up and put it on some jack stands. This helps give you some room under the car to turn the crank over with and also saves your back because you won’t be bending over the engine as much.

    2. Remove all the intake piping that runs over the head along with the BOV, injectors and spark plugs.


    3. Unbolt the throttle body from the intake manifold. Before removing the throttle body there are 2 water hoses that need to be disconnected. In the picture below you can see there is one located on the right and one on the bottom of the throttle body. The one to the right goes to the ISCV and is straight forward to remove. For the hose on the bottom, you need to lift the throttle body up as high as you can so you can fit some pliers in there to remove the clamp and then work the hose loose with either some tools or fingers.


    You can now take the throttle body off the intake manifold. Put a clean rag in the opening of the intake manifold to ensure no foreign objects enter the manifold.


    4. Undo the 14mm hex plugs that sit in the ‘valley’ between the cam covers. Disconnect the oil breather pipe that is on the left cam cover. Now you can start undoing the 12 bolts that hold the cam covers down. Remove the 2 cam covers and place them somewhere clean and upside-down. Or you can place them the right-way up on a flat smooth surface. Do not place them the right-way up on top of tools, trays etc, that may leave an impression on the seals. Also check the seals that they are not hard, brittle or have diminished. If they are, it is necessary to replace.


    5. Clean the now exposed surfaces of the head with a rag to remove the dirt that has built up over the years. Be careful not to push this dirt into the camshaft galleries or into the hex plug holes.


    6. Examine wear and tear, and pitting on the cam lobes. Then ponder about buying new cams… To expensive? Then move on as I did. After giving the hex plugs a clean, put them back into place. This stops dirt or dust entering the oil gallery through these holes.


    7. First you need to measure up the clearances between the cam lobes and shims. To do this the cam lobes need to be pointing straight up and not pressing down on the shim or otherwise it just won’t work. Draw up a table like the one below to record the shim clearances with.


    At this point I would highly recommend going out and buying a new set of feeler gauges in metric ranging from .05mm to .5mm in .025mm increments. It makes life easier when the maths comes around. Also go buy yourself a micrometer in metric so you can measure the shims with later on.

    To measure the shim clearances, you need to bring cylinder No. 1 to TDC to measure the 4 shims on No. 1, the 2 intake shims on No. 4 and the 2 exhaust shims on No. 5. After measuring those you can then measure the following with:

    Cylinder No. 2 at TDC: the 4 shims on No. 2, the 2 intake shims on No. 6 and the 2 exhaust shims on No. 4.
    Cylinder No. 3 at TDC: the 4 shims on No. 3, the 2 intake shims on No. 5 and the 2 exhaust shims on No. 6.

    The tolerances for the intake shim clearances are .15mm to .25mm.
    The tolerances for the exhaust shim clearances are .2mm to .3mm.

    If your clearances are within specs there is no need to replace the shims and record on your table ‘with-in spec’ for the ones that are with-in spec. If there are some out-of spec these will need replacing which we will do later on.

    8. Once you’ve done that, draw up another chart the same as above to record the shim thickness’s with. Removing and measuring the shims is the same process as measuring the clearances above, except you take the shims out and measure them. You can only take out the shims from the cylinders from which the cam lobes are facing up. Please note you do not need to remove the shims that are with-in spec, only the out-of spec ones.

    It is recommended to use SST #09248-55010 to remove the shims. However if you do not want to purchase said gold from Toyota you can simply use a couple screw drivers, a magnet and some good-old fashioned muscle.

    To do this, use a big screw driver to push down on the lip of the bucket in which the shim sits in. Once the shim is pushed down, use a little screw driver to pry the shim free of the suction caused by the oil in the bottom of the bucket. Then use a magnet to pull the shim out with. Measure the shim and record the thickness on the table and put it back where it came from (the reverse of taking them out).


    Pushing down on the bucket with the screw driver and prying the shim free with the little screw driver.
    Last edited by Negative Boost; 23-01-2007 at 04:48 PM.

  2. #2
    Kamber King Conversion King Negative Boost's Avatar
    Join Date
    Oct 2005
    Location
    Sydney
    Posts
    2,158

    Default Re: Guide: Changing Valve Shims on a 7MGTE


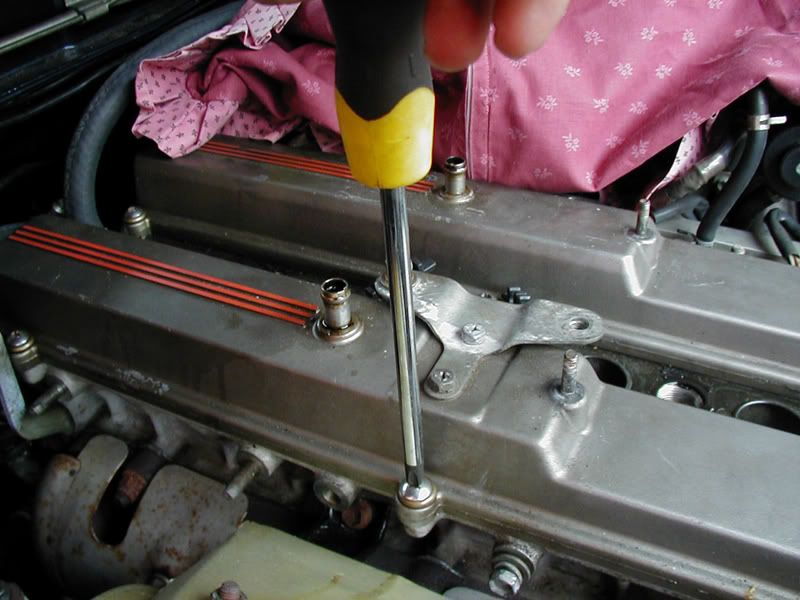
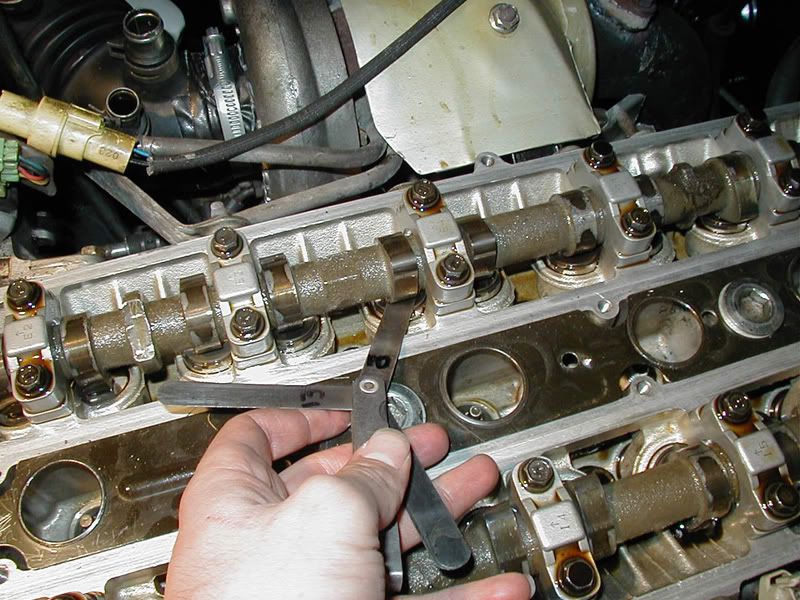
    Pulling the shim out with the magnet.
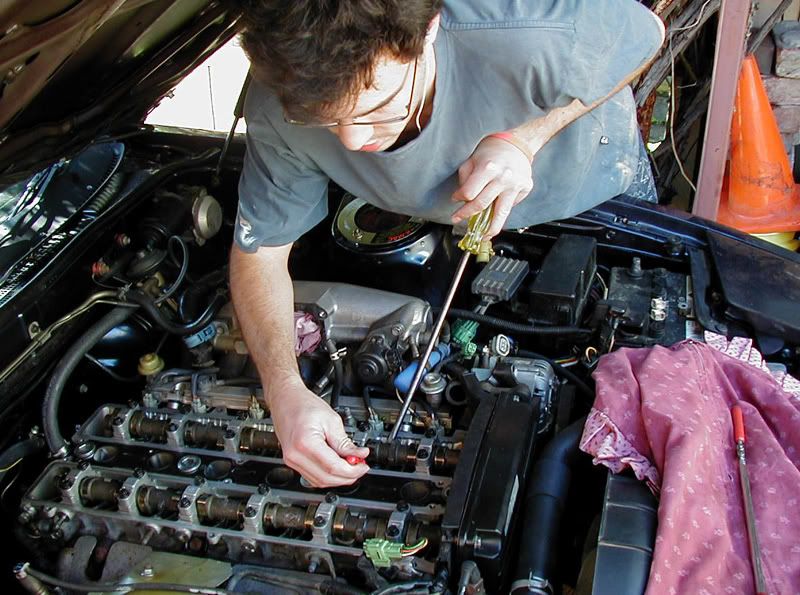
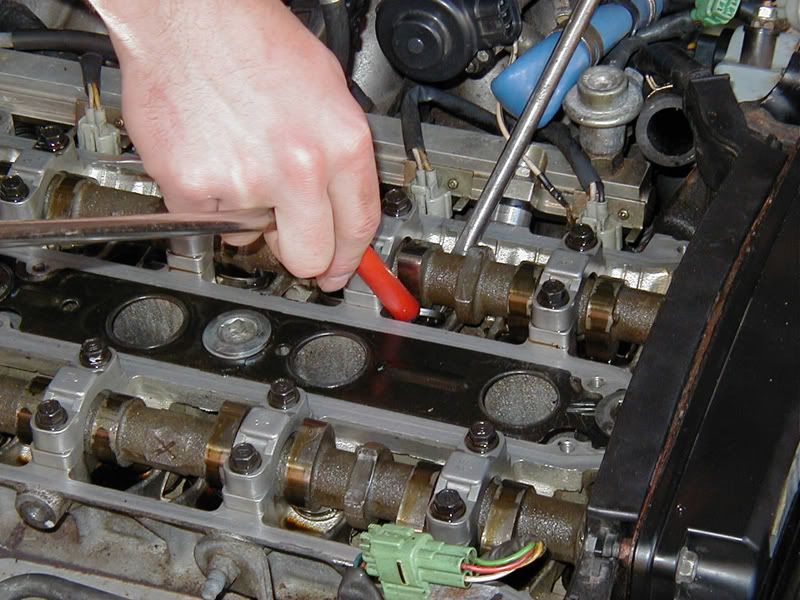

    Measuring the shim.

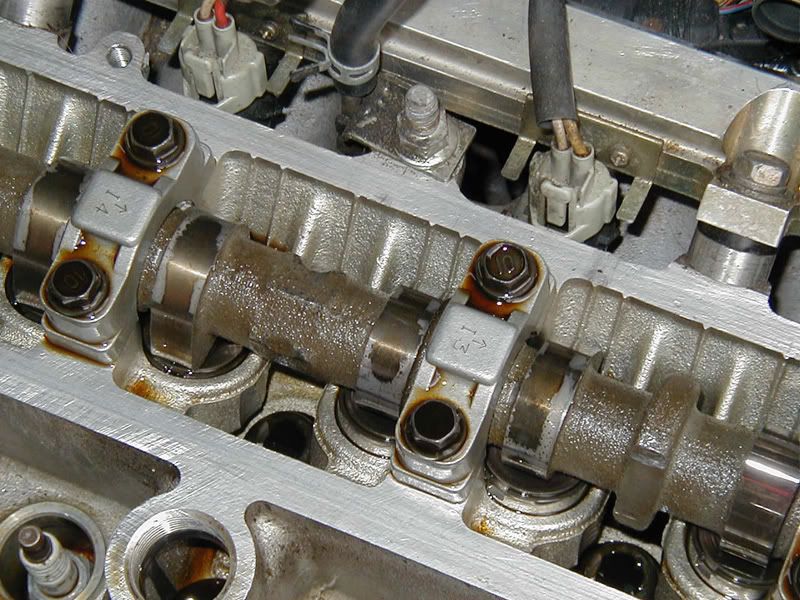
    I only measured the 1 shim at a time, so not to get the shims mixed up. Also if you have multiple shims out of the engine at once and you are turning the engine over, the cam lobes can enter into the recess of the bucket. If you keep turning the engine over the cam lobes will hit the side of the bucket and break them.

    You can measure up to 8 shims before needing to turn the engine over to measure the next set of 8. Once you’ve done that you can move onto the calculations.

    9. So once you have measured the shim clearances and the shim thicknesses, you can then work out the new shim size which you will need for each individual valve.

    The formula to work out the new shims is:

    Intake side: N = T + (A - O.20mm)

    Exhaust side: N = T + (A - O.25mm)

    N= Thickness of new shim needed

    T= Thickness of the shim that was in there previously (Table No. 2)

    A= The shim clearance that was measured (Table No. 1)

    If you have taken measurements in imperial values this excel sheet can do all the calculations for you. This was written by my very helpful dad. Click here to download. Note, you will need to delete the values in there already from my own calculations.

    10. Once you have the new shim sizes needed you may be lucky in that some of your old shims may be the correct size for some other valves, so you may be able to swap some around. When you know the amount of shims and sizes needed you can go down to the local Toyota or engine rebuilder and buy some. I paid around $12 for each shim at trade price from Toyota. I needed 17 of the suckers which made the exercise costly.

    11. Once you have them, you can proceed and replace the old shims with the new shims you have. As again it’s the same process as measuring the shims, only you’re putting your new shims back in. Once all the necessary shims have been replaced, put the negative terminal back on (making sure you remove your ratchet from the crankshaft) and crank the engine over for 10 seconds or so. This is safe to do so while the cam covers are removed as there is not enough oil pressure to squirt oil everywhere. This is done to settle the shims into their places. Then re-check all the shim clearances just to double check your maths is all okay and everything is with-in spec.

    12. Smile when all your shim clearances are with-in spec and you can now bolt everything back together again which is just the reverse of removing it all. But just before bolting everything back together again, i recommend checking the HG bolt torque's just to make sure everything is a-okay.


    13. Then drive away knowing your not going to have a shim pop out while doing 200 clicks in 5th gear at the local race-track!

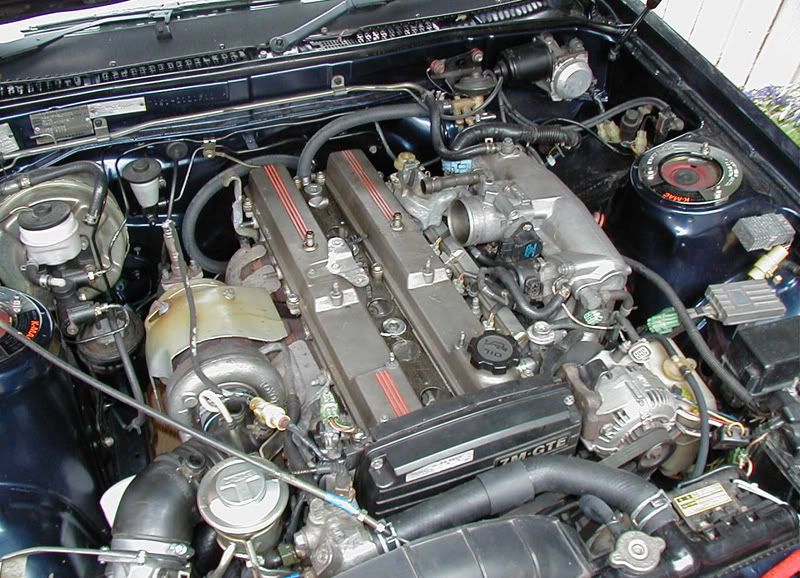
    The exhaust clearances on cylinder 4 on my engine were 5 thou (.127mm) over the maximum spec. This caused a very rattly noise on idle which sounded much like a diesel. 17 of my shims needed replacing with new ones and I was able to swap 4 shims around. My idle is nice and quite now with no odd or unwanted noises.

    Hope this helps a few doing their shims and if you have any questions ask away.

    Cheers
    Sam

  3. #3
    Altia ER34 GTT Domestic Engineer JetspeedCamry's Avatar
    Join Date
    Oct 2005
    Location
    Victoria
    Posts
    497

    Default Re: Guide: Changing Valve Shims on a 7MGTE

    Awesome! +rep!
    Kind Regards,
    Kurt.

    1998 ER34 ニッサン スカイラインGT- T
    RB25DET 5 Speed Manual | Blitz SE Return Flow FMIC | Greddy Profec II Spec B BC | Apexi N1 Turbo Back Exhaust

  4. #4
    I make people cry Chief Engine Builder Draven's Avatar
    Join Date
    Sep 2005
    Location
    NSW
    Posts
    4,281

    Default Re: Guide: Changing Valve Shims on a 7MGTE

    by "measuring dubilacy", do you mean some verniers?
    http://www.toymods.org.au/forums/showthread.php?t=7465
    Quote Originally Posted by xero View Post
    and of course campbell newman's completely fucking everything he touches so badly that he should be called dick fingers.

  5. #5
    Junior Member Backyard Mechanic Jaemus's Avatar
    Join Date
    Oct 2005
    Location
    NSW
    Posts
    273

    Default Re: Guide: Changing Valve Shims on a 7MGTE

    well written! rep!

  6. #6
    I make people cry Chief Engine Builder Draven's Avatar
    Join Date
    Sep 2005
    Location
    NSW
    Posts
    4,281

    Default Re: Guide: Changing Valve Shims on a 7MGTE

    btw: with 10 rep, it will only count as a neutral... but it's the thought that counts, right? *grins*
    http://www.toymods.org.au/forums/showthread.php?t=7465
    Quote Originally Posted by xero View Post
    and of course campbell newman's completely fucking everything he touches so badly that he should be called dick fingers.

  7. #7
    Kamber King Conversion King Negative Boost's Avatar
    Join Date
    Oct 2005
    Location
    Sydney
    Posts
    2,158

    Default Re: Guide: Changing Valve Shims on a 7MGTE

    No, a Micrometer is what i meant. Edited above now.

    Lol, yes its the thought that counts. Thanks Jaemus and the rest of you.

  8. #8
    I make people cry Chief Engine Builder Draven's Avatar
    Join Date
    Sep 2005
    Location
    NSW
    Posts
    4,281

    Default Re: Guide: Changing Valve Shims on a 7MGTE

    hrm, vote 1 digital verniers over external micrometers.. but cool tools, never seen them before.
    http://www.toymods.org.au/forums/showthread.php?t=7465
    Quote Originally Posted by xero View Post
    and of course campbell newman's completely fucking everything he touches so badly that he should be called dick fingers.

  9. #9
    Junior Member Grease Monkey Bored?'s Avatar
    Join Date
    Dec 2005
    Location
    nsw
    Posts
    135

    Default Re: Guide: Changing Valve Shims on a 7MGTE

    How often would it be worth clearancing the valves?

  10. #10
    Rest in Peace Conversion King ViPeR_NiPPleX's Avatar
    Join Date
    Oct 2005
    Location
    VIC
    Posts
    2,183

    Default Re: Guide: Changing Valve Shims on a 7MGTE

    where did you buy your torque wrench? I want one exactly like that as they are so easy to use... just don't mix up the torque ratings

    Another great article, worth the read... a shame I don't have shims

  11. #11
    Oh What a Feeling! Backyard Mechanic c2888's Avatar
    Join Date
    Nov 2005
    Location
    Victoria
    Posts
    332

    Default Re: Guide: Changing Valve Shims on a 7MGTE

    I've used two torque wrenches that look like that, one was branded repco, and the other warren brown. tho i suspect the repco one was just a rebadge of the WB as it was same as my memory goes back.

    There's no dead cressidas at the local pick a part? Might take you a while to get the covers and cams out, but theres 24 of them in each head, bound to get a few you need for cheap/free.

    And oh my that is one clean engine, tho i'm used to seeing dead camry and corolla motors, service? oil change? good work!

    Dan
    The spanner in my avatar is actually a 16mm, that's why it's still new

  12. #12
    Kamber King Conversion King Negative Boost's Avatar
    Join Date
    Oct 2005
    Location
    Sydney
    Posts
    2,158

    Default Re: Guide: Changing Valve Shims on a 7MGTE

    Thanks guys,

    Quote Originally Posted by Bored?
    How often would it be worth clearancing the valves?
    Every 72 months or 96,000km's according to the Maintenance section in the TSRM.

    Quote Originally Posted by ViPeR_NiPPleX
    where did you buy your torque wrench
    Not too sure sorry. Its my dads and i think he's had it for a while, i'll ask him in the morning.

    Quote Originally Posted by c2888
    There's no dead cressidas at the local pick a part?

    And oh my that is one clean engine, tho i'm used to seeing dead camry and corolla motors, service? oil change? good work!
    Unfortunatly there is no you-pull-it wrecking yards down here in Tassie. Its actually very hard even trying to find sports cars that are being wrecked down here. Good thinking though.

    And thankyou, it is one very clean engine aint it! I've only had the engine for 2500km's and Chris (Urantia), the owner before me, serviced it every 2000km's. Thats why there's no black oil build-ups in the head.

  13. #13
    Junior Member Automotive Encyclopaedia
    Join Date
    Dec 2005
    Location
    Tallahassee, FL USofA
    Posts
    1,115

    Default Re: Guide: Changing Valve Shims on a 7MGTE

    Are they regrinds?? Those are very strange wear patterns on the lobes!
    Thanks!

  14. #14
    Kamber King Conversion King Negative Boost's Avatar
    Join Date
    Oct 2005
    Location
    Sydney
    Posts
    2,158

    Default Re: Guide: Changing Valve Shims on a 7MGTE

    I'm not sure. The engine has 152,500km's on it and Chris only had it for 10,000km's before me. It could be possible they are re-grinds but i dont know. I thought the exact same too when i looked at them, very weird wear marks.

  15. #15
    Kamber King Conversion King Negative Boost's Avatar
    Join Date
    Oct 2005
    Location
    Sydney
    Posts
    2,158

    Default Re: Guide: Changing Valve Shims on a 7MGTE

    Quote Originally Posted by ViPeR_NiPPleX
    where did you buy your torque wrench? I want one exactly like that as they are so easy to use... just don't mix up the torque ratings
    Yup it is a Warren and Brown. 20-200lb/fts.

Similar Threads

  1. T, 2T, 2T-B, 2T-C & 2T-G Specifications & Diagrams
    By river in forum Tech and Conversions
    Replies: 67
    Last Post: 29-02-2016, 12:30 PM
  2. 7MGTE Oil cooler relief valve question
    By Negative Boost in forum Tech and Conversions
    Replies: 10
    Last Post: 21-07-2010, 03:51 PM
  3. changing valve springs 4AGZE
    By nick.parker in forum Tech and Conversions
    Replies: 13
    Last Post: 08-11-2006, 11:03 AM
  4. Changing 4AFC valve stem seals
    By broken22 in forum Tech and Conversions
    Replies: 1
    Last Post: 03-02-2006, 03:50 AM

Bookmarks

Posting Permissions

  • You may not post new threads
  • You may not post replies
  • You may not post attachments
  • You may not edit your posts
  •