Page 12 of 20 FirstFirst ... 21011121314 ... LastLast
Results 166 to 180 of 287

Thread: 1GGZE into an RN85 Hilux Dual Cab 2WD [Beware - lots of pix]

  1. #166
    Junior Member Automotive Encyclopaedia infotechplus's Avatar
    Join Date
    Apr 2006
    Location
    NSW
    Posts
    816

    Default Re: 1GGZE into an RN85 Hilux Dual Cab 2WD [Beware - lots of pix]

    Quote Originally Posted by TA-022
    i thought the testing was free?
    Emissions test is free. Yes. The engineer charges $400-$500 to collate and prepare report.

    Sorry for any confusion.

    Cheers,

    Peter
    OMG - Winner of the Official "Forum Comment of the Week"!

  2. #167
    iconoclast Backyard Mechanic Youngy's Avatar
    Join Date
    Dec 2005
    Location
    NSW
    Posts
    312

    Default Re: 1GGZE into an RN85 Hilux Dual Cab 2WD [Beware - lots of pix]

    Slight tangent I know. When I took my original cert to the RTA they copied it and kept the copy.

    I then asked "aren't you supposed to keep the original and give the copy to me?". At this point the RTA lady looked quite surprised that I should question the RTAs processes and said, "Oh no, we keep the copy. It's all ok and on record."

    Getting a straight answer is tough sometimes...............

  3. #168
    Junior Member Carport Converter TA-022's Avatar
    Join Date
    Sep 2005
    Location
    NSW
    Posts
    1,616

    Default Re: 1GGZE into an RN85 Hilux Dual Cab 2WD [Beware - lots of pix]

    ... and never the same twice!
    Black Betty >HERE!<

    (\__/)
    (='.'=) This is Bunny. Copy and paste bunny into your
    (")_(") signature to help him gain world domination.

  4. #169
    Junior Member Automotive Encyclopaedia infotechplus's Avatar
    Join Date
    Apr 2006
    Location
    NSW
    Posts
    816

    Default Re: 1GGZE into an RN85 Hilux Dual Cab 2WD [Beware - lots of pix]

    Building and Installing the Exhaust System

    The 1G-GZE engine has the exhaust manifold on the opposite side to the original 22R so this posed some questions about how I was going to get an exhaust to fit. Normally I would have just taken it to an exhaust shop and said "Do it".

    I got some quotes to do just that but there wouldn't have been much change from $800 - $900 given the labour involved in squeezing pipes alongside the already cramped engine bay. The biggest problem is the torsion bar which doesn't allow much room to negotiate.

    Now, in keeping with the rest of this project <<insert severe cursing here>> I thought it might be appropriate to tackle the job myself. Given that the labout costs would be the major component I decided to give it a shot in true Toymods DIY fashion. Besides I'd done the full year's welding and fabrication course at TAFE a couple of years ago so it was about time I used those (already forgotten ) skills.

    Materials

    This is what I gathered together to do the job:

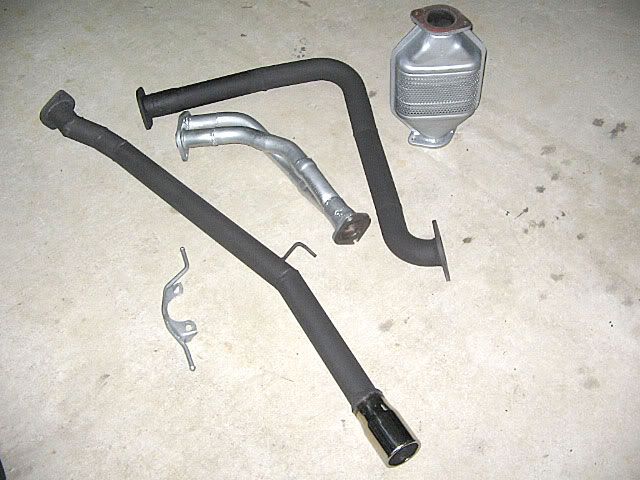
    1 x 5M-GE y-pipe (Pick'n'Payless $20) (the one I got still had good O-gaskets so grab these if they look OK - they are S20 a pair new at Toyota)
    6 x 2 1/4 in flanges from VL Commodore (ditto $5 each = $30) (I priced these new at $15 each)
    1 x VL Commodore (V6) catalytic converter (ditto $75) (Not much bargaining on the cat as they sell them to the scrap merchants for the precious metals inside them)
    1 x Lukey straight thru/offset Sports muffler (ditto $20)
    1 x 3 in chrome tip (attached to muffler)
    3 metres 2 1/4 in aluminised tubing (Parramatta Exhaust Centre $10 p.m. = $30)
    2 x mandrel bend 90 deg (ditto $15 ea = $30)
    3 x gaskets to suit (ditto $5 ea = $15)

    Note: don't forget to grab the bolts that are attached to both ends of the cat if you can - makes the job much easier than searching for the right size thread and length later. Ditto for the muffler if they aren't rusted over.

    Also, make sure the cat and muffler haven't suffered any internal damage, intentional or otherwise.

    I also reused all the hangers, rubber doughnuts and original bolts from the 22R system, which meant cutting/removing them from the piping.

    Equipment You'll Need

    The minimum equipment you will need that will really make the job easier and your time more efficiently used:

    Electric cut off saw with metal disc
    Welding equipment
    Angle grinder with cut off disc and metal grinding disc
    Hacksaw
    Sandpaper
    A black marker pen to mark everything up
    Aluminium engine enamel (for headers, cat and muffler); stovepipe matt black (for the tubing) - not essential but hey it's gotta look professional.

    Time Period Allowed

    I allowed a full weekend to do this. Remember I have no previous experience so everything was trial and error.

    The Job

    The first job I tackled was fitting the 5M-GE Y-pipe. The first pipe I got at PnP I ended up cutting into pieces to see how I could best fit it to the 1G manifold. In the end I gave up and binned the pieces. Some weeks went by and I grabbed another Y-pipe whilst at PnP doing something else. It looked slightly different in shape than the first one, and getting it home confirmed this. The pipe work looked neater with less press bends in it and the angle at the collector was much better suited to the Hilux lower engine bay.

    I determined that by cutting out a section of the piping just below the flange I could fit this without too much hassle. After three goes (I was very cautious in how much I cut out) I got it to fit beautifully - a total of 85mm cut out.


    You can see the cut and weld in the above photo. It is 75mm down from the bottom edge of the flange.

    So that was the first job taken care of. I was very happy with myself after this as it would have been a major cost to get the exhaust shop to build those pipes. The only part I was to supply was the upper flange .

    Little did I know that was only the beginning of the headaches.

    I rang around exhaust shops and got quotes for tubing. I wanted 2 1/4 in ID for low down torque, about 3 - 4 metres. Some were willing to supply; others probably thought it too little to be worth they're time. Parramatta Exhaust Centre were very helpful and I bought 3m of aluminised piping from them - they even opened up both ends of the pipe for me to make intial fitting easier.

    I made a sketch of the most efficient route the exhaust should take, keeping bends to a minimum. I also purchased 2 x 90 deg mandrels from P.E.C..

    I would use one of the 90 deg bends just after the cross-member under the 'Lux, and then the other to straighten back up again and follow the original 22R route using the same hanging hardware and positions.

    My original idea was to make this system modular, hence the six flanges. That way I could swap bits out as need be eg. new muffler or cat. The first flange would be at the base of the y-pipe but the angle was an utter b@$tard. I had to cut grooves lengthwise in the flange so that I could tap it onto the collector enough to then remove the lot and tack it. I then had the problem of filling the four slots I'd cut. The aluminium engine enamel hides it well doesn't it?


    Not only that I had to limit the length of tubing attached to it because if it was too long I couldn't get the y-pipe out again. It's a very tight fit under there, between the chassis rail and the torsion bar.


    In the above photo you can see the first flange, then a straight section, the 90 deg bend, a cross piece and then the second 90 deg bend heavily cut down to allow for the angle to the cat. This section looks easy but I can tell you it took several goes to get all the angles right. Each of the sections was an angled cut which meant try it, fit it, cut it a couple of times. The marker pen comes in handy here.

    Fitting the cat was the next job, and it was the most tedious, due to the angles of the cat's flanges. Matching my flanges to the cat was another nightmare, and I think this was where I stopped Saturday arvo (with a massive headache).


    Cheers,

    Peter
    Last edited by infotechplus; 02-04-2007 at 01:00 PM. Reason: Damn typos
    OMG - Winner of the Official "Forum Comment of the Week"!

  5. #170
    Junior Member Automotive Encyclopaedia infotechplus's Avatar
    Join Date
    Apr 2006
    Location
    NSW
    Posts
    816

    Default Re: 1GGZE into an RN85 Hilux Dual Cab 2WD [Beware - lots of pix]

    As you can see in that last photo, the cat's engine enamel looks pretty battered. That's because I lost track of how many times I bolted it in and out. A couple of times my tack welds snapped and the whole thing fell apart. I don't think my hands are ever going to be the same!

    I was utterly (I was going to say 'exhausted') shagged from Saturday and Sunday morning I was debating whether I would do anything or have a rest day. But, going down to the work area was enough to recharge my enthusiasm.


    I had the down pipes in, the first section complete, and the cat fitted up. So the next job was to do the section to the muffler (which was already hanging in position) and the tail section. Hey, I was busting to see the 3 in chrome tip sticking out from under the towbar alright?


    So here we are at the back of the cat. That hangar is reversed from it's original position - it made fitting everything up easier. I gave the rusted bolts a clean up on the wire wheel and some WD-40 as they were in and out many times.


    Attaching the straight section to the muffler was easy. Remember PEC had already flared the end of the pipe. Then I had to attach that to a flange and line it up on the cat and hangar.

    The next section took quite some time as every little piece had to be angle cut to clear the rear axle. I didn't want to spend any more money on mandrel bends so I had to improvise.


    This is the hanger from the rear of the Lux's frame:


    It is bolted to a metal ring that is clamped around the tailpipe. The nut was rusted out so removing it peacefully was not an option - violence was required. I hacksawed the main section off, and then ground it down. What you see above is actually reversed from the original.

    Here's the finished section. This also took a couple goes.


    I marked the cutting angle, and the line up marks, then went to clean everything up on the bench grinder in the garage, only to find when I went to tack it in place I'd obliterated the marker pen. What is it with human beings that allows us to say "No, I don't need to re-mark it, I know where it goes?"

    Well, when I got it tacked, and went to fit it, the angle was all wrong so I had to break it and re-do it. This time I did mark it up and be careful not to make a mess of it.

    This photo gives you some idea of the angle over the axle:


    By now it was Sunday afternoon and my old bones were crying foul. I had cramps in my legs and my hands were seizing up too.

    But the job was complete (except for final welding), and I was very happy. There's a real snse of achievement when you do stuff like this (especially for the first time). I can't wait to hear this system - I think it's gonna sound really nice.


    I will have it all welded up during the week, paint the pipework matt black with the high heat stovepipe paint, and redo the silver bits to tidy them up. Then I'll refit everything.

    I'll see if I can capture a sound bite when it's done, and post it up.

    Cheers,

    Peter
    Last edited by infotechplus; 02-04-2007 at 01:27 PM. Reason: Typos
    OMG - Winner of the Official "Forum Comment of the Week"!

  6. #171
    Junior Member 1st year Apprentice Bullfrog's Avatar
    Join Date
    Nov 2006
    Location
    victoria
    Posts
    41

    Default Re: 1GGZE into an RN85 Hilux Dual Cab 2WD [Beware - lots of pix]

    Pete, as always another very informative thread, I have a feeling that your new exhaust is going to be quite loud !!!

    when i decided to start my conversion i went to vicroads to ask about what i had to do for them. there answer "you are better of to call the engineers to find out what there requirements are " i just laughed and asked if the guy if he had any idea and he looked at me with that ' ahhh i dunno look ' on his face. so i did a little investigating and came up with this.

    http://epanote2.epa.vic.gov.au/EPA/P...$FILE/1031.pdf
    Hilux RN110

    1G-GZE Gen 3 Conversion currently underway

  7. #172
    Junior Member Automotive Encyclopaedia infotechplus's Avatar
    Join Date
    Apr 2006
    Location
    NSW
    Posts
    816

    Default Re: 1GGZE into an RN85 Hilux Dual Cab 2WD [Beware - lots of pix]

    Quote Originally Posted by Bullfrog
    Pete, as always another very informative thread, I have a feeling that your new exhaust is going to be quite loud !!!
    I won't really know until I get it hooked up later this week. If there is excessive noise then by making it modular I can address that issue, or even put in a silencing device.

    Quote Originally Posted by Bullfrog
    So I did a little investigating and came up with this.

    http://epanote2.epa.vic.gov.au/EPA/P...$FILE/1031.pdf
    I had a read of that document. Very interesting, and more up-to-date than anything I could find here in NSW. I know it refers to Vic but I thought it might be a good exercise to see how I'd go if I was in Victoria.

    I certainly don't have a problem with anything it says. In particular:

    1. I see VicEPA allow pod filters of a paper construction on EFI engines. (p5)
    2. The "Engines" section, in particular 3(d) and 3(e) is all good.
    3. Superchargers - mine's all standard. Section 4, dot point 3 "identical to the production vehicle" (at least to the car the engine came out of!)
    4. Section 7 "Engine Management Systems" - again, standard ECU.
    5. Section 8 "Auxiliary and replacement fuel tank - I've kept the charcoal canister.
    6. Section 9 "Exhaust Manifolds" - points (a) and (b) all good.
    7. Section 10 "Exhaust systems" cat and muffler are in exactly same place as original, albeit the cat is slightly further away from the manifold by virtue of the manifold being on the other side of the engine to the 22R.
    8. Section 11 "Noise Limits" - 90 dB(A)? Well, we'll have to see on that one.

    On a side note, it's interesting that the document makes reference to mufflers with "sliding openings, ... restrictive or temporary insert plates". Aren't they the ones now being advertised in Fast Fours, etc for that very purpose? Is this another case of we can sell it but it's illegal to actually use on your car. The Amercians at least put the "for off-road use only" tag on these products.

    Thanks Andrew.

    Cheers,

    Peter
    OMG - Winner of the Official "Forum Comment of the Week"!

  8. #173
    Junior Member Automotive Encyclopaedia infotechplus's Avatar
    Join Date
    Apr 2006
    Location
    NSW
    Posts
    816

    Default Re: 1GGZE into an RN85 Hilux Dual Cab 2WD [Beware - lots of pix]

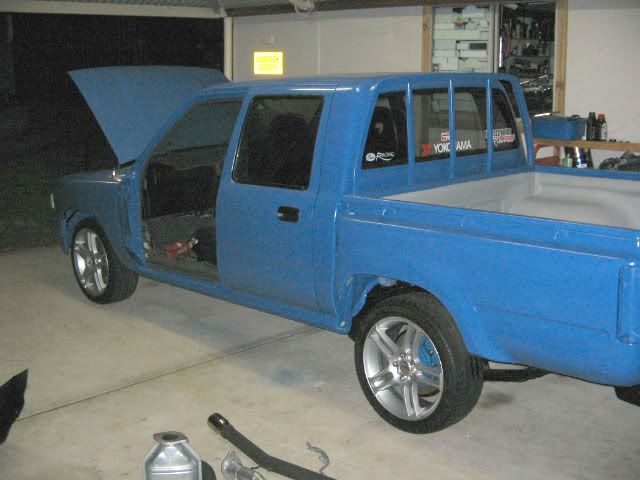
    The exhaust system is now fully welded up, and all pipes painted matt black. The silver bits have just received another quick coat to bring them up as new.

    Tomorrow I will be installing the system on the Lux and giving it it's first full workout. Hopefully my back neighbour will be appeased, although the Lukey offset muffler might have other ideas.


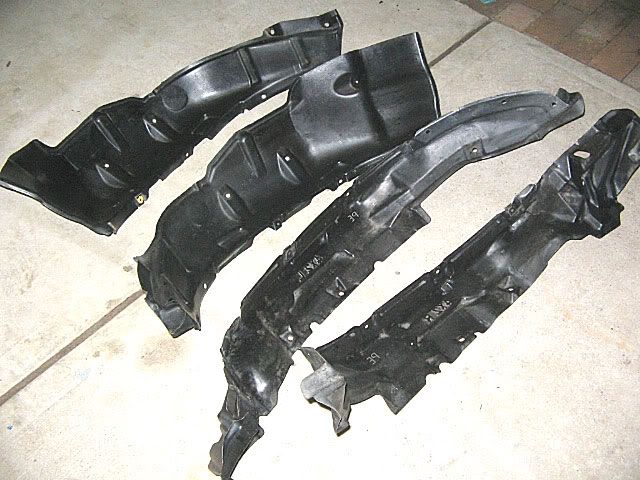
    I've also found my wheel arch plastic liners and having retrieved them from under the house and given them a scrub, I'll also install them tomorrow.


    So here's a quick photo of the Lux as she stands:


    cheers,

    Peter
    OMG - Winner of the Official "Forum Comment of the Week"!

  9. #174
    Village Idiot Automotive Encyclopaedia
    Join Date
    Nov 2005
    Location
    Hoppers Crossing
    Posts
    1,130

    Default Re: 1GGZE into an RN85 Hilux Dual Cab 2WD [Beware - lots of pix]

    pete that back needs lowering. can someone say airbags

  10. #175
    Breaker OfThe Unbreakable Backyard Mechanic Herus's Avatar
    Join Date
    Feb 2007
    Location
    SA
    Posts
    310

    Default Re: 1GGZE into an RN85 Hilux Dual Cab 2WD [Beware - lots of pix]

    i agree Grega...

    Ive actually got a set ready to go into mine

    Eventually ill be at a point where i can install them

    Andrew
    Member's ride thread!

    Joined Team BHG, 19/7/2008

    Joined Team JZX83, 15/11/08

  11. #176
    Junior Member Automotive Encyclopaedia infotechplus's Avatar
    Join Date
    Apr 2006
    Location
    NSW
    Posts
    816

    Default Re: 1GGZE into an RN85 Hilux Dual Cab 2WD [Beware - lots of pix]

    Quote Originally Posted by Grega
    pete that back needs lowering. can someone say airbags
    Yeah I know what you mean.

    I took the 3 inch lowering blocks out for rego purposes.

    Cheers,

    Peter
    OMG - Winner of the Official "Forum Comment of the Week"!

  12. #177
    Junior Member Automotive Encyclopaedia infotechplus's Avatar
    Join Date
    Apr 2006
    Location
    NSW
    Posts
    816

    Default Re: 1GGZE into an RN85 Hilux Dual Cab 2WD [Beware - lots of pix]

    Phew!

    It's been a long day. Only really stopped for a couple of hot crossies and a cuppa around morning tea time. Started at 7:00am to do a bit of tidying up, and I've just finished 4:00pm.

    The first job on the list was to bolt up the rear tray. This was pretty straightforward - two bolts on the front (one each side), then a pair of washers and nuts middle and rear. Done.

    I fitted up the rear lights, plate lights and numberplate next:


    I'd already re-wrapped all the wiring after fixing it - two wires had come away from the crimped joins. So I chopped it all up and re-soldered everything including the trailer plug and Tekonsha electric brake line. Everything checked out OK there.

    The next major job was to fit up the exhaust.

    Everything went smoothly at the y-pipe and the s-section to the cat. I put the gaskets in and did the bolts up loosely to make sure everything would line up OK. One hangar rubber went on at the cat but the other was too far away so I had to make some modifications with a Lebanese screwdriver (hammer ) That done, the next step was the straight section to the muffler. No problem there.

    However, as is always the case, the last section over the axle wouldn't line up at the flanges. I needed longer bolts too, and this made it possible to join it up with a bit of coercion. The problem is the angle of the last section of straight pipe to the tip is not enough to clear the tow-bar:


    And this results in the pipework hitting the axle further up at the muffler:


    The solution is that I will have to cut this section, and either create a wider angle, or (I'm thinking) getting another mandrel 90 deg and exit it behind the rear tyre.

    I tried firing it up after that but it wouldn't start.

    I figured the tank was probably close to empty so a trip up to the servo with a can was in order. Emptying 5 litres into the tank and hitting the key resulted in the wanted reaction.

    Damn, I was so disappointed with how quiet the system was. This one won't be troubling any noise meters methinks. Interesting given the straight-through nature of the Lukey.

    Anyway, I'll leave it for now.

    I also refitted all the inner guard liners using all new screws and plastic grommets (not really new, just collected them at Pick'n'Payless a while ago knowing most of mine were missing). Still need a few more though which I'll grab next week.

    Used a product called Meguiar's Gold Class Trim Detailer to bring the plastic back to life. I was really impressed with the job this stuff did on the old liners. Can't remember how much it was - I've had it for quite some time but Supercheap Auto carry it.

    .

    Last job was to clean the wheels and refit them, and give the tyres some TLC.

    Doesn't seem like much does it?

    I'm concerned about the engine "hunting". I thought initially it was due to there being no exhaust but even with the full system on, it's still doing it. A steady "brrrmmmm, brrrmmmm" like I'm revving it slowly. I suspect a vacuum leak but does anyone have any experience with this issue? Your assistance would be appreciated. Where should I look?

    Cheers,

    Peter
    Last edited by infotechplus; 11-10-2012 at 11:17 AM.
    OMG - Winner of the Official "Forum Comment of the Week"!

  13. #178
    Village Idiot Automotive Encyclopaedia
    Join Date
    Nov 2005
    Location
    Hoppers Crossing
    Posts
    1,130

    Default Re: 1GGZE into an RN85 Hilux Dual Cab 2WD [Beware - lots of pix]

    pete, start with O2 sensor wiring. make sure its right
    hunting is a rich/lean condition - the cause of it is the computer trying to compensate for too lean or too rich a mixture.
    does the 1G have an AFM? flap or wire type? sticky flap maybe? just my 2c

  14. #179
    Junior Member Automotive Encyclopaedia infotechplus's Avatar
    Join Date
    Apr 2006
    Location
    NSW
    Posts
    816

    Default Re: 1GGZE into an RN85 Hilux Dual Cab 2WD [Beware - lots of pix]

    Quote Originally Posted by Grega
    pete, start with O2 sensor wiring. make sure its right
    hunting is a rich/lean condition - the cause of it is the computer trying to compensate for too lean or too rich a mixture.
    does the 1G have an AFM? flap or wire type? sticky flap maybe? just my 2c
    02 sensor wiring looks good, is installed without any leaks and is connected. I'm running AFM with a flap. I'll pull it off and check it out. It could also be that I have a wire from the ECU not connected too.

    Cheers,

    Peter
    OMG - Winner of the Official "Forum Comment of the Week"!

  15. #180
    Junior Member Automotive Encyclopaedia infotechplus's Avatar
    Join Date
    Apr 2006
    Location
    NSW
    Posts
    816

    Default Re: 1GGZE into an RN85 Hilux Dual Cab 2WD [Beware - lots of pix]

    On the long weekend I went up to see IN 05 NT to pick up a mid/rear sump to see if would be a better fit than my modded front sump. More on that in a moment.

    I had to modify my exhaust as it was fouling on the tow bar. I got another mandrel bend from Parramatta Exhaust Centre, a 60 deg one, to allow me to exit the exhaust behind the rear wheel, well clear of the damn towbar.

    I also took a trip up to Pick'n'Payless to get some assorted screws, rubber grommets, etc to finish off various pieces around the Lux including the correct fitting to mount the line from the booster to the engine on the firewall. I found a couple of chromed tips that I thought might look good but I eventually went with this one.


    I hacksawed it off a Commodore and whoever made it did a really nice weld job on the collector. Cost $10.

    So now the exhaust is complete and fully installed.

    Whilst at PnP I also got another aluminium bracket that fits between the brake booster and the firewall. I've modified it so that it is about 6-8mm wide and hopefully that will allow me to fit the MA70 brake booster correctly with all four nuts on the inside, and the stop light to function correctly.

    This is the inside of the 1G front sump:


    This is a profile view. Front is to the right in the photo:


    I've removed my modified front sump and here is a comparison of it and the mid/rear sump:


    Here's a profile comparison. There's obviously a lot more capacity in the mid/rear:


    The problem, however, is that it too needs a small modification to clear the steering arm, with a section to be removed at the front to allow the steering arm to move back when the wheels are pointing straight ahead.

    This is the mid/rear sump's oil pickup mounted under the 1GGZE:


    This is the front sump oil pickup:


    The mid/rear sump fits under the 1GGZE with the oil pickup installed. The only other annoyance is the sump plug. It's directly above the frame but it can be removed with a bit of perserverance:


    Continued in next post.

    Cheers,

    Peter
    OMG - Winner of the Official "Forum Comment of the Week"!

Similar Threads

  1. Rn110 hilux 1GGZE conversion
    By Bullfrog in forum Engine & Driveline Conversions
    Replies: 28
    Last Post: 15-02-2009, 09:17 PM
  2. Will RN85 grille fit on my 86 hilux ?
    By quicknissan in forum Tech and Conversions
    Replies: 1
    Last Post: 19-10-2006, 08:08 AM

Bookmarks

Posting Permissions

  • You may not post new threads
  • You may not post replies
  • You may not post attachments
  • You may not edit your posts
  •